In the course of my Information Technology career disaster protection has always been a constant concern at every level. Historically the primary concern has always been protecting what I would now think of as physical disaster; fire, flood or other event that would make the production systems I helped to maintain unavailable. Sure there have always been other concerns like loss of connectivity or as we saw with the COVID-19 pandemic a mass migration to work from home, but the primary driver was always the Saturday night disaster flick scenario.
In the past decade we’ve seen the main driver in designing disaster recovery policy dramatically shift to security needs, namely ransomware. Just to recap for all, ransomware attacks typically happen in a number of stages:
- Scan public facing systems to find open ports for known applications (example: web servers, Remote Desktop sharing, management platforms)
- Attempt to gain credentials to these systems through phishing, password reuse/previous password exploit followed by privilege escalation (becoming Domain Admin)
- Quietly perform a system inventory to identify all the systems you can gain access to
- Deploy your virus payload to all systems and leave in a dormant state
- Finally execute your encrypting process on all the systems and attempt to collect the ransom
That’s the general playbook that has been in play as long as we have talked about ransomware. More recently, and largely thanks to the Conti hacking group, there is now also a step 4a; As the attack is encrypting systems the backup software host is accessed via native commands and an attempt to delete or make unavailable any and all backups, both on premises as well as off-site. So now in this case we, as those responsible for Disaster Recovery, have to start taking a new twist on an old take; finding a way to make backups a secured, protected set of data, arguably more so than any other data that our organization has.
So how do we do this? The legacy answer to this would be pure air-gapping; the act of taking a set of backups, usually on tape, and making them inaccessible in times not actively in use. While this does fit the bill of protecting a set of the backups it has a number of drawbacks. First the mediums that make this possible are slower on both writes and reads than modern standards dictate. Second, they require significant human interaction which is problematic in our heavily automated IT world of today.
The more modern method of achieving an air-gapped type of solution is through the concept of immutability, the act of making data writable but uneditable for a defined period of time. Most commonly this is handled with AWS s3 compatible object storage but it is worth knowing that there are other methods of handling this. The goal is to set a defined period on backup files during which they cannot be deleted. In effect you are creating a fully connected, air-gapped set of backups.
Most of your modern disaster recovery solutions now have methods of supporting immutability. One such feature that I’ve recently tested is the Cohesity DataLock capability. With Cohesity DataLock you can set a protection group to be immutable through policy when it hits the cluster. With version 6.8 and later this can be extended through the CloudArchive feature to create a secondary copy off-site of that data to an object bucket such as 11:11’s Object Storage. Implementing these capabilities is a pretty simple process with the only real hang up being that you must first create a user that holds the Data Security role to enable the feature on the policy.
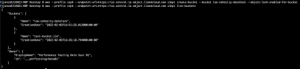
Create Object Lock Enabled Bucket. I am using AWS CLI against 11:11’s s3-compatible Cloud Object Storage.
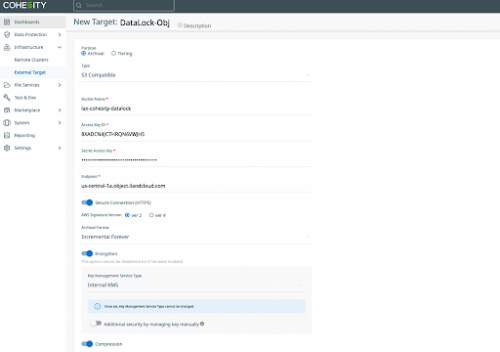
Now access your Cohesity cluster and register your new bucket as an external target.
Infrastructure | External Targets | Register
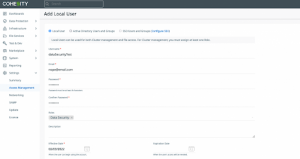
Next we need to add a new local user with the data security role.
Access Management | Add Local User
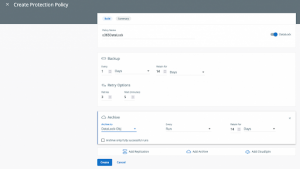
Log out as your current user and log in as your newly created user then either create a new Data Protection Policy or edit an existing policy and toggle the DataLock setting.
Data Protection | Policies | Create Policy
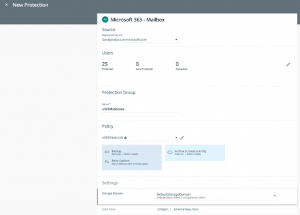
Create or edit a Protection Group and assign your DataLock enabled policy to it.
Data Protection | Protection
Once your job runs (if you created new it will automatically run the job and then ship to archive upon saving) the process is complete! Your local copy will be locked and immutable with a secondary copy now saved offsite.