
 In this article, we will walk through the process for creating a Veeam Replication Job to the iland VCC cloud. There are several options when creating a job and this guide should help you understand these settings a bit more. This will be an overall guide for a typical job, however, you may change the settings to fit you own DR strategy needs.
Now that you have an idea on how you would like to group your VMs and have a retention policy in mind, you are ready to begin creating your replica jobs. You can use the below guide to get started with your jobs:
-
- In your Veeam console, click on the “Backup and Replication” tab on the left side and then click the “Replication Job” button near the top of the window.
- Give your replica job a name and description. Below, there are 3 checkboxes you can select.a. Low Connection Bandwidth (enable replica seeding): This option is for seeding an existing replica. You can use this option if you have replicated a server before, but have either moved the VM to be processed by a new job or have removed the VM from replication for any reason. If this is the first time replicating a server, you will not need this enabled.
b. Separate Virtual Networks (enable network remapping): On the iland side, you will have failover networks that the replica servers connect to during a failover event. You will have already set the subnet mask and default gateway during the Add Service Providerprocess. This box allows you to then map the source and target networks. For instance, if a VM is on the “VM Network” in your production environment, you will map that network to your Hardware Plan network. The actual mapping will be configured later in the job wizard.
c. Different IP Addressing Scheme (enable re-IP): This option is disabled when replicating to a VCC Service Provider. If you check this box, it will automatically be disabled when selecting a Cloud Host as the target.
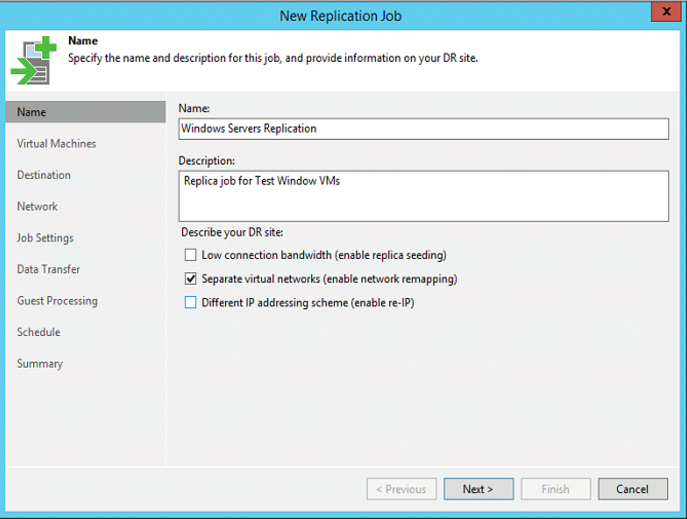
The Job name and DR Site settings page for a Veeam replica job
-
- Click next to the Virtual Machines window. Click “Add” to select the VMs form the datacenter browser. You can also search for the VM in the bar below. Once you have selected one, or multiple VMs, click the “Add” button.
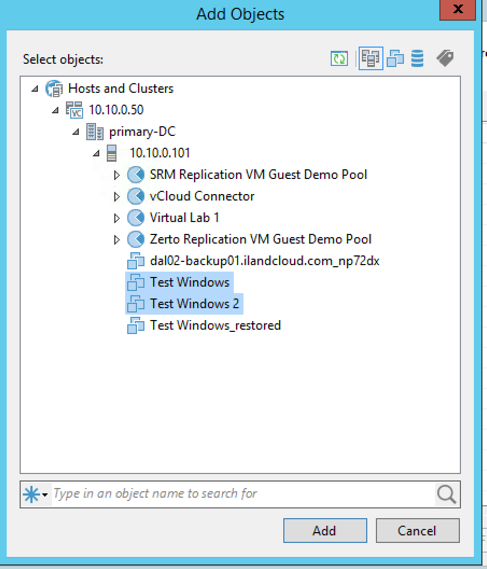
Adding VMs to a Veeam replica job.
-
- a. If you would like to replicate from backup files, choose the “Source” button on the right side. In the Source Repositories select the “From backup files (latest VM state available in backups)” radio button. You can then select the backup repositories where the backups files are located. For more information on replicating from a backup, please visit
-
- .
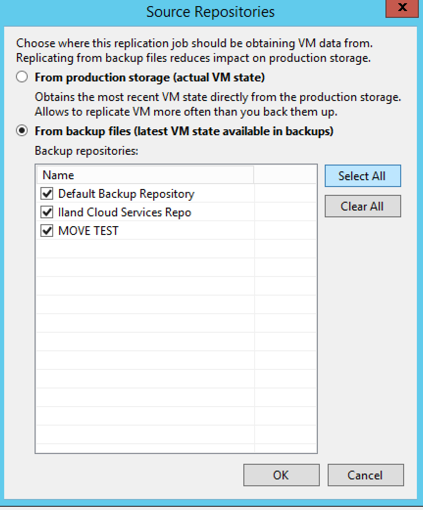
Choosing a backup repository to use as a replica source
-
- Click “OK” to go to the Destination window. In the Host or Cluster section, click “Choose” and then “Cloud Host.”
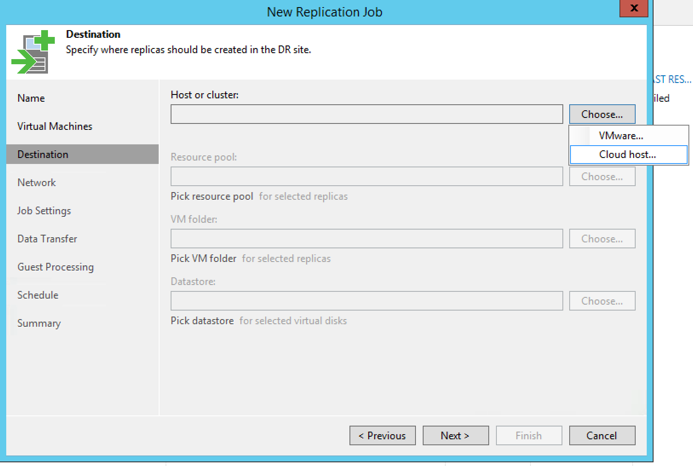
Setting the target host to Cloud Host allowing for replication to a Cloud provider
In the Select Host box, expand the Service Provider to select your hardware plan, please note that the URL name may be different than what is shown in my lab. Once selected, click “OK” and then “Next.”
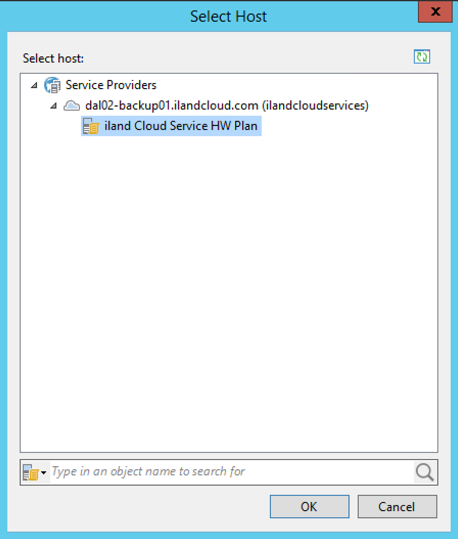
Selecting your Hardware Plan
-
- In the Network window, we will configure the network mapping from the source networks to the target networks on the iland side. Click the “Add” button to open the Network Mapping box.
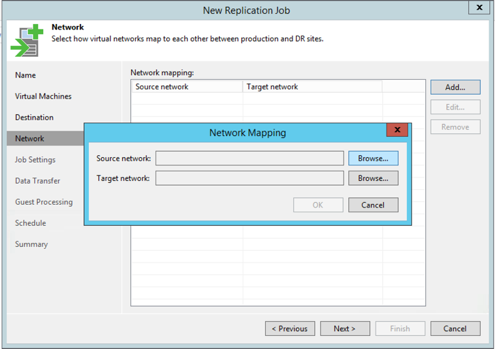
The Network Mapping screen
-
- a. Click “Browse” on the source network and expand your hosts to find the network that your production servers connect to. In my case, my production servers are connected on the VM Network. If you do not see the network, make sure you check under a host that has production machines running under it. When you have selected the right network click “OK.”
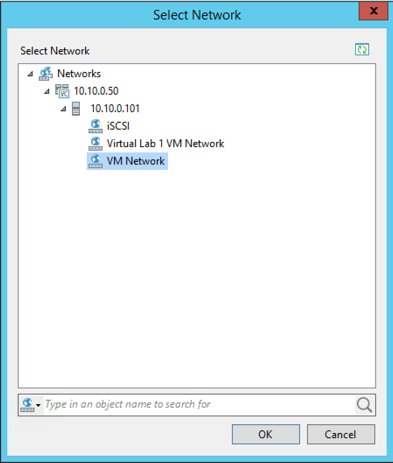
Choosing the source network
-
- b. Now click “Browse” on the Target network. You will see the available networks on the target side to use. If you only have one, you can just select the network there. If you have multiple networks, make sure that you are selecting the network that corresponds correctly to the mapping that you set in the Manage Default Gateway section in our
-
- . For instance, if your production network uses 192.168.10.1/24, and you set your HW Plan Network 1 to use 192.168.10.1/24, make sure you are selecting that network. Click “OK” when finished.
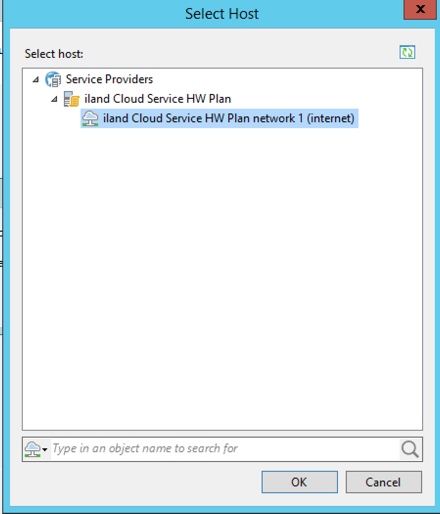
Choosing the failover network from your hardware plan
-
- c. In this scenario, we now have my VM Network in my production environment mapping to my failover network in my Hardware Plan. This setting maps the network for all VMs in this job. If you have multiple networks, you will repeat the process mapping the remainder of your networks. Click “Next” when you have all networks mapped.
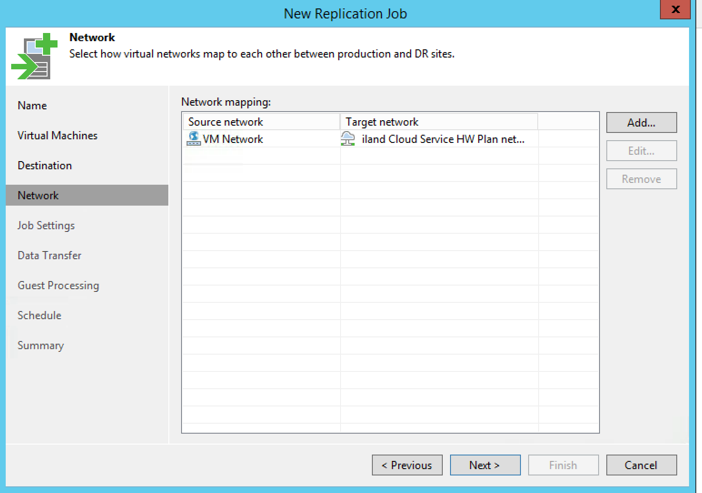
A mapped network for a Veeam replication job
-
- Under the “Job Settings” page, we will have a few options to go over.a. Repository for replica metadata: This will be the location where Veeam stores the metadata for VMs being replicated. The metadata folders are generally pretty small, less than 1GB, and can be stored on the same repository you backup to.
b. Replica name suffix: By default, this is set to “_replica.” When Veeam creates the replica server on the iland side, it will add this suffix to the VM name in VMware. So, if your server is called FS1 in your vCenter, it will be created as FS1_replica at iland. This only applies to the VM label in vCenter, not the actual BIOS or DNS hostname.
c. Restore points to keep: This sets the number of snapshots for a server. Keep in mind, this is only restore points, not days. So, if you have seven restore points to keep but run your job every 12 hours, you will only have about 3.5 days of retention.
- Under the “Job Settings” page, we will have a few options to go over.a. Repository for replica metadata: This will be the location where Veeam stores the metadata for VMs being replicated. The metadata folders are generally pretty small, less than 1GB, and can be stored on the same repository you backup to.
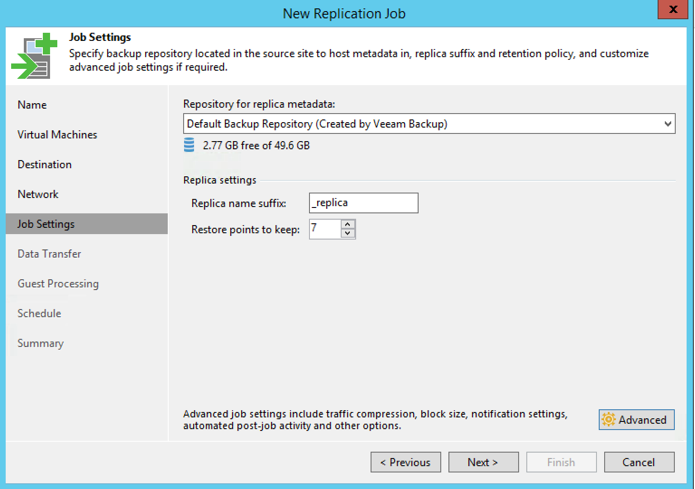
The Job Settings page, including replica suffix and restore point settings
d. Advanced Settings: Click on the “Advanced” button to open the advanced settings for the job. iland recommends that you change the Storage Optimization setting to “WAN Target” under the “Traffic” tab. This optimizes compression and deduplication settings to give the best performance for replication to an offsite target. The LAN and Local target settings are generally used for local replication where you may be using fiber channel or other Layer 2 connectivity. You can keep the rest of the settings as default.
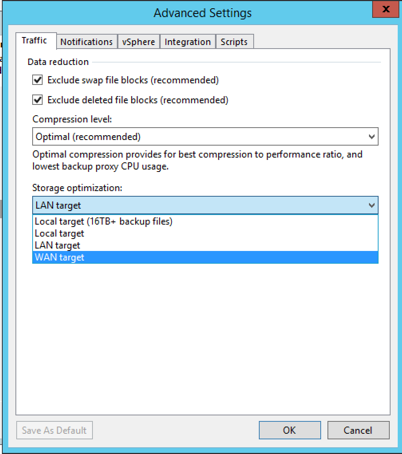
The Advanced Settings in a Veeam replica job
-
- When you have the job settings configured, click “Next” to the Data Transfer page. If you do not have any extra proxy servers for Veeam replication, you can click “Next” on this window. However, if you have built proxies for replication, you can click the “Choose” button to select to use all or just particular proxies for this job. Click “Next” to the Gust Processing page.
- You may want to enable application-aware processing for certain servers or a job. This helps in creating application consistent backups for Exchange, SQL, AD or database servers. If you enable this feature, you will need to provide Guest OS administrator level credentials. For more information on application-aware processing with Veeam, please visit their Help Center.
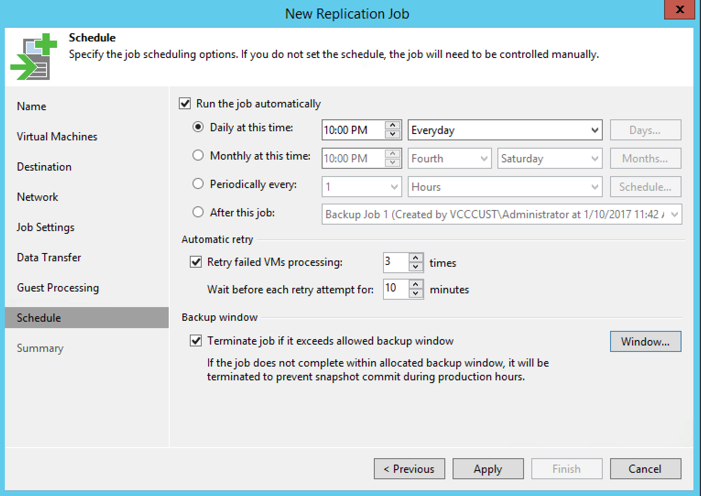
The Scheduling settings for a Veeam replica job
-
- The last step will be to set the schedule for the job. Click the checkbox to Run the job automatically to create a scheduled task to begin the replica job.
a. Scheduling: You can then choose to run the job daily or on specific days, monthly on a particular day or periodically. You can also schedule the job to run after another job completes.i. This can be useful if you are replicating from backup files. For instance, let’s say FS1 is backed up in Backup Job 1 and you would like to replicate FS1 in Replica Job 1 using the backup files. You can set the schedule for Replica Job 1 to begin after Backup Job 1 completes, ensuring that your replication happens only after the backup finishes.b. Automatic Retires: By default, Veeam will auto retry a job that has failed three times with 10 minutes in between each attempt. The number of automatic retries and delay in between each attempt can be adjusted.
c. Termination Window: By clicking the “Window” button, you can configure block of time when a replica job is allowed or not allowed to run. By default, the job is able to run at any point in time. In my example, I chose to disable replication during production hours of 8:00 a.m. to 5:00 p.m. Monday through Friday. If a job runs long for any reason, Veeam will automatically terminate replication at 8:00 a.m. This helps in ensuring replication does not run during production hours affecting performance of bandwidth availability for your end users.
- The last step will be to set the schedule for the job. Click the checkbox to Run the job automatically to create a scheduled task to begin the replica job.
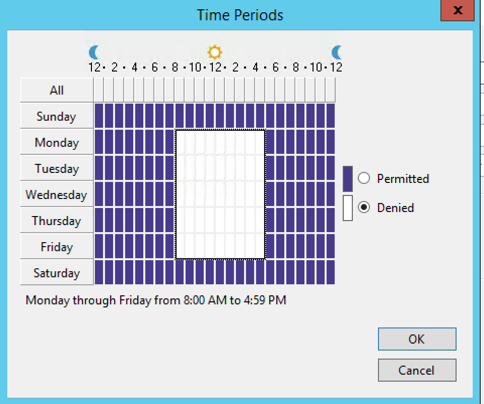
Setting a Termination Window for a replica job
- At this point, you can finish the job wizard and chose to run the job immediately or wait for the next scheduled start time. Keep in mind that the initial replication will be considerably longer than your later incremental jobs. So, it may be best to leave extra time for the first jobs to finish and possibly stagger the first run for each of your created jobs.
Now that we have our jobs created we will want to monitor the jobs and ensure we are getting restore points for our replicas in case disaster strikes. In my next post, we will go over Veeam Network Appliances and walk through creating Failover Plan.