

Date: June 27, 2017
Author: Mike Mosley
Editor’s Note: As of January 2022, iland is now 11:11 Systems, a managed infrastructure solutions provider at the forefront of cloud, connectivity, and security. As a legacy iland.com blog post, this article likely contains information that is no longer relevant. For the most up-to-date product information and resources, or if you have further questions, please refer to the 11:11 Systems Success Center or contact us directly.
The first step in configuring DRaaS with Veeam Cloud Connect is adding a service provider to your Veeam environment. This will be done from your Veeam console under the Backup Infrastructure tab.
Connecting to a Veeam Cloud Connect Service Provider
To add 11:11 Systems as a Service Provider, you will first need to ensure that port 6180 is allowed both outbound and inbound to your Veeam server. You will receive an SSL certificate when connecting that will authenticate the server to connect to the 11:11 VCC stack. After your VCC environment is deployed, you will be given the information to connect by the 11:11 Cloud Services team.
You can add 11:11 as a service provider in your Veeam Console with the following steps:
-
- Click the Backup Infrastructure tab on the left side of the screen and then choose Service Providers.
- Click the Add Service Provider button at the top of the window.
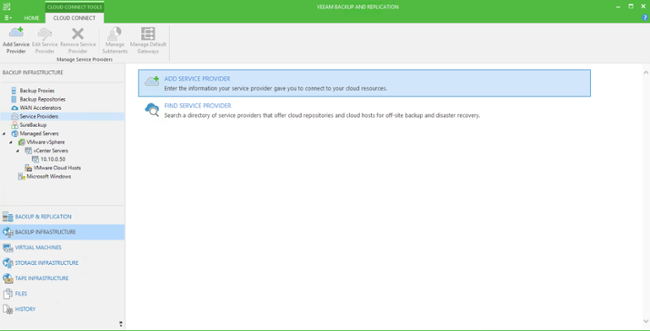
- A Service Provider wizard will appear. On the first page, enter the DNS name provided by the 11:11 Cloud Services team. Once complete, hit “Continue.”
a. If you are using Veeam 9.5 Update 2, you can select to allow 11:11 to manage your Veeam environment. This will require you to provide 11:11 with credentials to manage this Veeam server and is completely optional.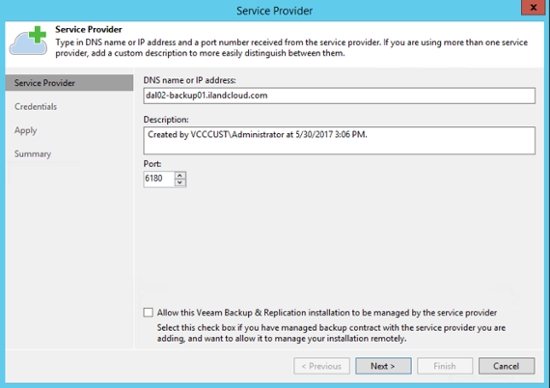
-
- On the Credentials page, you should see the GeoTrust certificate in the “Verified by:” section near the top of the page.
a. If you see “unknown” there was an issue with the certificate validation. Ensure that you are able to ping the DNS name and that it was entered correctly. Make sure port 6180 is open outbound and inbound to the Veeam server. If you are still not able to verify the certificate, please contact 11:11 Support.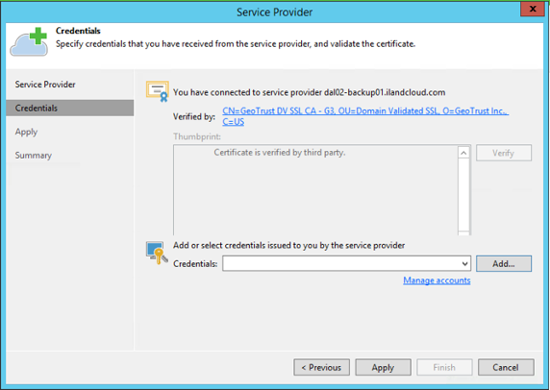
-
- Click the “Add” button to enter your tenant username and password. This will be provided to you by the 11:11 Cloud Services team. Once entered click “OK” and then “Apply.”
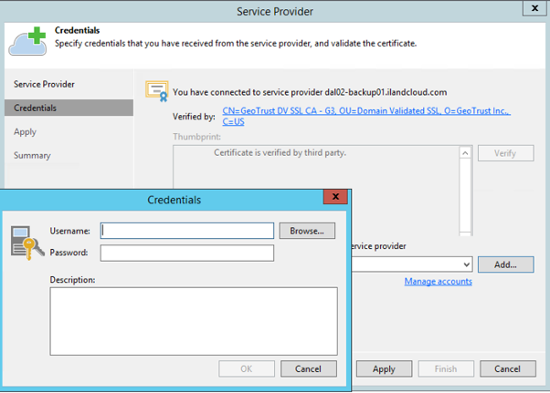
Adding tenant credentials to connect to a Service Provider
- On the hardware plans page, you will see your 11:11created Hardware Plan. Please verify that the CPU, RAM, Storage and networking information is correct. Click “Next.”
- Click the “Add” button to enter your tenant username and password. This will be provided to you by the 11:11 Cloud Services team. Once entered click “OK” and then “Apply.”
a. If you are using VCC with 11:11 for backups and replication at the same data center, you may see the Resources page. This will show the cloud repository being used for backup data. If you are only using VCC Replication, or backing up to a different data center, you may not see the Resources page in the wizard.
-
- Next will be the Network Extension page. If you have chosen to not use a Veeam NEA, you may not see this page.
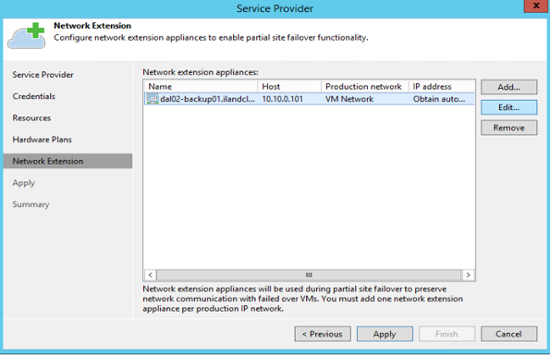
The Network Extension Appliance to be deployed on the source site
When using a Veeam NEA, a VM template will be deployed on the source side as well as the 11:11 side. The NEA deployed on the source side will only be used during a partial failover. On this page, we will configure this VM by clicking the NEA and choosing “Edit.”
a. Host: This will be the host on the source side the NEA is deployed on. The NEA can be deployed on any host that is connected to the production server’s network.
b. Resource pool: This will be the resource pool the NEA deployed in. For instance, if you have a resource pool in your VMware environment for management or Veeam, you might place this in that resource pool.
c. Datastore: This will be the datastore the NEA is deployed on. The NEA is less than 2GB in size, so this can be deployed on a datastore that has at least 2GB free.
d. Network: You will want to place the NEA on the same network as the production VMs. This will allow for communication between the production and failover network during a partial failover. For instance, if your production servers are on “VM Network” you will want to place the NEA on that network as well.
e. IP Information: Lastly, you can set the NEA to obtain an IP through DHCP or set a static IP. Typically, this works best by setting a static IP so it is documented. You can then fill in the subnet mask and default gateway that matches the network.
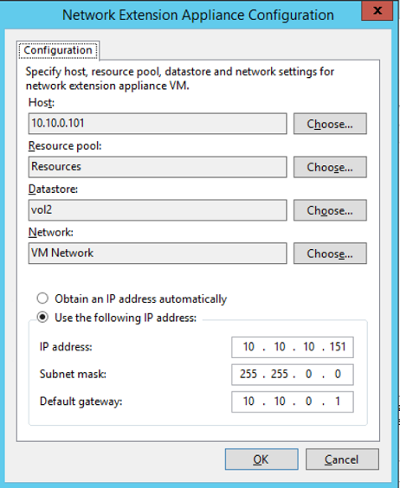
Configuring the deployment settings for the Network Extension Appliance
- Click “Next” to add the service provider and ensure all steps were completed successfully.
- If there is an issue with the NEA deployment, you may see a failure here. There may be an issue with assigning the IP dynamically or something else. In that case, you are still able to set up replica jobs, but the NEA will not be functional. You can open a ticket with Veeam or 11:11 Support to resolve the issue.
- Click “Next” and then “Finish” to complete the Service Provider wizard. You should now see the provider listed in your backup infrastructure.
Managing the Service Provider Properties
If you had any issues with the NEA deployment, you can right click on the provider and choose “Properties.” You can click “Next” in the wizard to change any NEA properties, such as the host or IP, as well as update the tenant credentials for the Service Provider. You can also use this page to rescan the service provider which can be done by right clicking the service provider and selecting “Rescan.” This resyncs the connection to the service provider and authenticates the SSL certificate which is useful after network issues, changes to the hardware plan or replication failures.
You can also select the service provider and click the “Manage Default Gateways” button at the top of the screen or right-click the provider and choose “Manage Default Gateways.” When11:11 builds your Veeam Hardware Plan, we will set the number of networks. However, that is the only options we have from a provider standpoint. Under the Manage Default Gateways window, you can set the default gateway and subnet mask for your failover networks.

The Manage Default Gateways button under the Service Providers page
This page will configure the networks in use by Veeam when failing over to 11:11. For instance, in my production environment my servers are connected to a network with a subnet mask of 255.255.0.0 and default gateway of 10.10.0.1. I have matched these settings under Manage Default Gateways so that my servers will have public network access during a failover. If you have multiple networks, you can set the subnet mask and default gateway for each network on failover. There is also a checkbox to route traffic between the networks when multiple networks are in use. So, if you have a 10.10.0.0/16 network and a 192.168.10.0/24 network, this box will allow servers on those two networks to communicate with each other. If you are using a third-party firewall, this option is less important as you will configure the interface on the firewall itself.
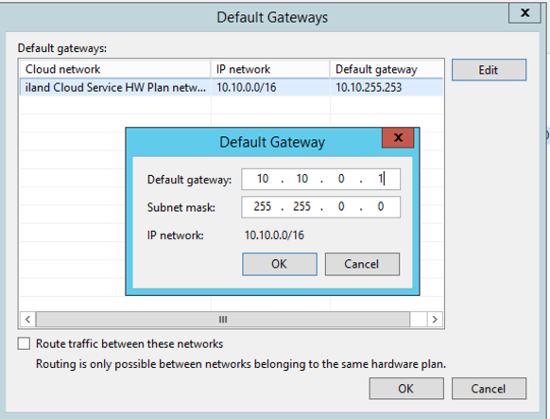
Configuring the default gateway for the FAILOVER NETWORK in your Veeam Console
At this point, you should have added and connected to 11:11 as a Veeam Cloud Connect Service Provider. The next step will be to create and run replica jobs to 11:11. We will go through this in the next post and explore the options available for replication.