 Editor’s Note: As of January 2022, iland is now 11:11 Systems, a managed infrastructure solutions provider at the forefront of cloud, connectivity, and security. As a legacy iland.com blog post, this article likely contains information that is no longer relevant. For the most up-to-date product information and resources, or if you have further questions, please refer to the 11:11 Systems Success Center or contact us directly.
So, after covering an introduction to Zerto and installation and configuration best practices in my two most recent blogs, I’m now going to tackle the very important topic of Virtual Protection Groups (VPGs). Zerto VPGs allow you to create a group of VMs to be protected together, giving you many different options for replication and recovery configuration. With your ZVM and VRAs installed, you are now ready to create Virtual Protection Groups (VPGs). In this blog, I’ll delve into the key things you need to consider when creating a VPG as well as best practices to ensure your Zerto cloud DR environment is optimized.
VPG Grouping Considerations
When creating a VPG, the main thing to consider is how you wish to group your VMs for replication and recovery. You may have a large variety of servers that manage different services or applications as well as servers on multiple networks. Ultimately, the decision on how to create VPGs will be up to you, but reviewing the considerations below during the VPG creation process will help greatly.
First, you may want to consider creating a VPG that is reserved for your Domain Controllers or Active Directory Servers. In the event of a failover, you want to make sure this is the first VPG to failover to ensure your domain is established on the recovery side before the other servers failover. You may run into issues if a SQL or web server powers on before the domain servers do as that will restrict access or communication with the domain.
When it comes to creating VPGs for the rest of your servers, there are several ways to group up VMs. A good idea might be to group servers that are dependent on each other for running an application. If you have a web server that works with a backend database server, you might want to group these servers together. This way, if there is a failover scenario, you know these two servers will fail over together. You can also set a boot order within the VPG, so in our case, we may want to make sure that during a failover, our database server powers on first, then the web server. Depending on your setup, you may have multiple servers, exchange servers, and application servers. You could consider grouping servers by their services. For instance, placing the AD/DC and other critical domain servers in one or two VPGs. Next, you might have the exchange and database servers in their own groups. Lastly, application servers would be grouped together in one or more VPGs. So, during a failover, you would first kick off the critical domain groups, then the exchange and database VPGs, and lastly your application servers. The goal is to try to have your VMs grouped so that it provides an easy and understandable flow during failover scenarios.
Optimizing RPOs with VPGs
Another thing to consider is that servers will replicate and failover as a group. What this means is that the sum of all data changes between all servers in the VPG are replicated in one group. So, if you have one SQL server and four web servers in one VPG, that VPG must replicate the changes made by all four servers. This can possibly cause issues in VPGs where there is one server that creates a significant amount of data change as compared to others servers in the VPG. For instance, in our case, the SQL server may be causing a large amount of change, while the web servers are mostly static. The Recovery Point Objective (RPO) of this VPG as a whole may suffer as Zerto may hit points where it is struggling to keep up with the changes caused by our SQL server. In this case, it may be best to separate the SQL server to its own VPG. This way, our four web servers will stay in sync as the VPG is only concerned with their changes. The SQL server will also see a boost in performance as the bandwidth for this VPG is reserved only for SQL changes. The SQL VPG can also be given a high priority, which tells Zerto to allocate more bandwidth to this VPG. This also means that during a failover, all VMs in the group are failed over. So with our VPG containing the four webservers, all four will be failed over together. There is no way to fail over just one of the servers in the VPG.
Finally, keep in mind the number of VMs you put in one VPG. If you are only protecting 10 VMs, you may create just one VPG so you are able to easily fail over the servers and control their boot order in the VPG. However, you lose some granularity with this. If only one of the servers is down or needs to failover, you have to failover the whole environment. Depending on your bandwidth, you may also start running into issues like the four web servers and one SQL server described above.
Creating VPGs
Once you have an idea of how to group your servers in VPGs, the next step is to create them. In your Zerto console, you can click on the VPGs tab, which will show a page similar to the one below. By clicking the “New VPG” button, you can start creating your first VPG.

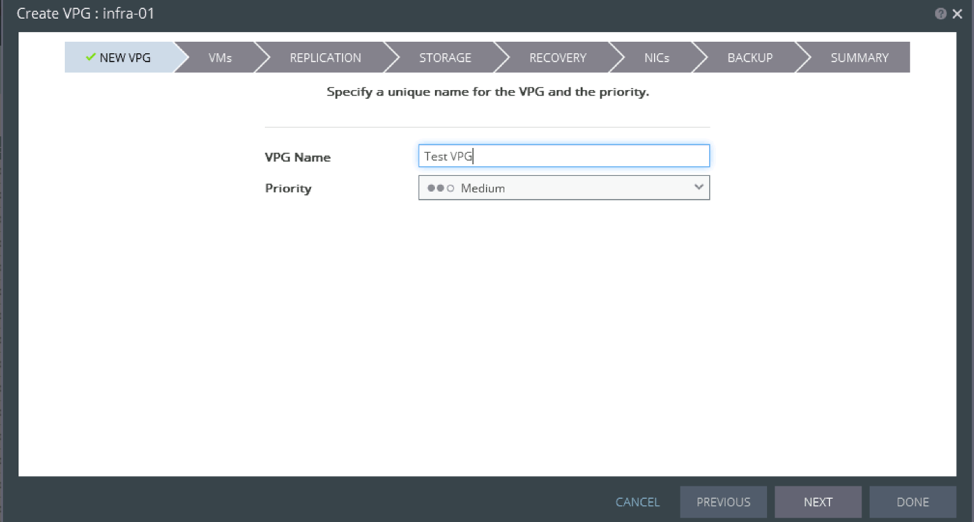
The first step is to give the VPG a name and set its priority. The VPG can be given a high, medium, and low priority, and this determines how Zerto will prioritize bandwidth allocation. For instance, a VPG with high priority will be given more bandwidth than VPGs with medium or low bandwidth. In the case where you have three VMs with high priority, more bandwidth is allocated to the group that has the larger amount of data change. This can be helpful during the initial replication period, times when the production environment is experiencing a high load, or after the network disconnects. If you have servers that are more critical or maybe have a higher change rate than the others, you may want to give those VPGs a high priority. This will ensure that your critical servers consume the bulk of your bandwidth and stay in sync.
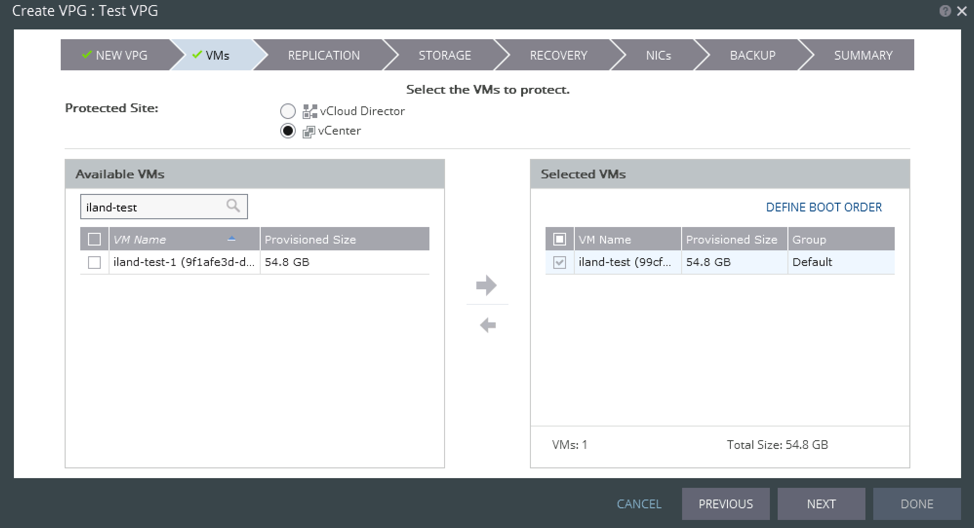
Next, you will pick the VMs to add to your VPG. In the left-hand column, you will see all your servers that are on hosts with a VRA. To add a server to the VPG, check the box next to one or more of the servers and click the right arrow button.
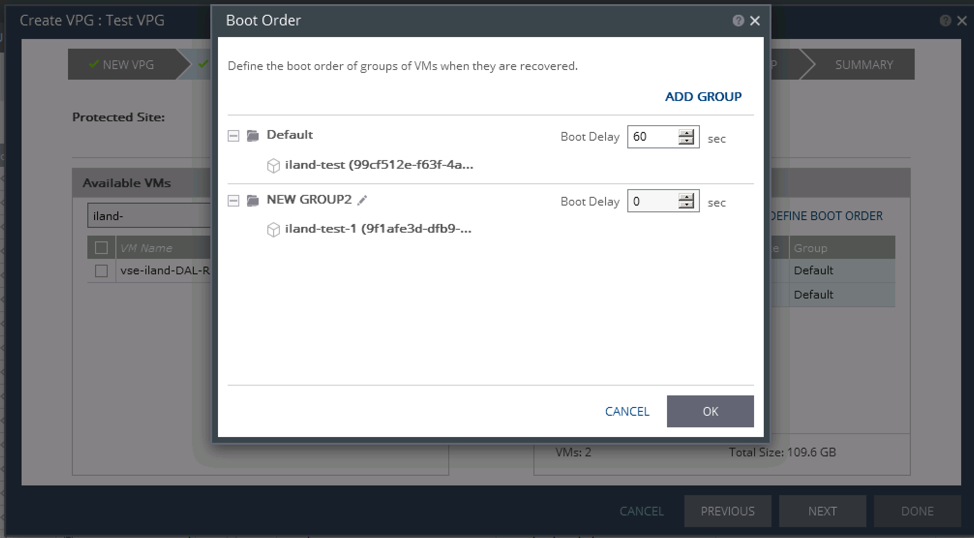
Once you have added the servers to the VPG, you can alter the boot order by clicking the “Define Boot Order” button above the selected VMs. The boot order is determined by grouping your VMs into different folders. In my screenshot, I have the iland-test server booting first in the Default Folder. I have moved the iland-test-1 server to NEW GROUP 2. To create a group, click the “ADD GROUP” button in the Boot Order window. To create a boot order, set the Boot Delay to the number of seconds you want to wait before the NEXT GROUP is powered on. The screenshot is set to have iland-test boot first, wait 60 seconds, and then boot iland-test-1. When the boot order is set, click “OK” and then “Next.”
VPG Rules and Alerting
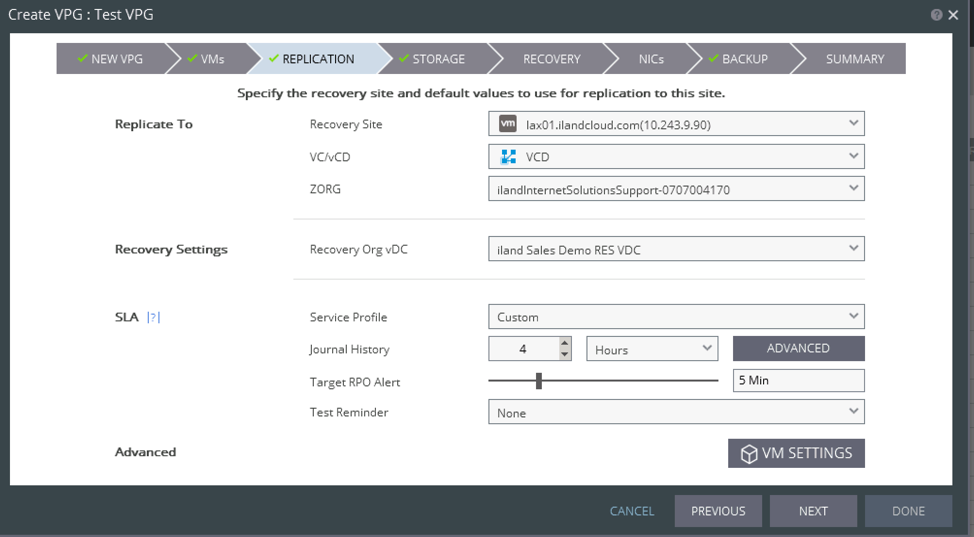
Under the Replication Tab, we can change many of the rules and alerting for the VPG:
- Recovery Site: This is the failover environment the servers are replicating to and will failover to. Typically, you will just have the 11:11 Systems data center as an option here. If you are replicating to multiple sites, just make sure the server to be protected to 11:11 has the 11:11 data center selected.
- VC/VCD: You may only see this option if you are using a vCloud Director environment on the source site. The 11:11 Cloud environment is based on vCloud Director, so you will choose VCD if you have this option.
- ZORG: This is your customer-dedicated organization in the 11:11 Cloud environment. You will most likely just have one option for this setting, which is your 11:11 provided Org name.
- Recovery Org vDC: This is the virtual data center created for your organization. Again, you will typically just have one option here. This is where the resources for your environment are allocated.
- Service Profile: By default, a system service profile is used that is just a template for setting the remaining settings. To make a change to the VPG’s Journal History, RPO Alert, or Test Reminder, select “Customer” on this dropdown.
- Journal History: By default, this is four hours. The Journal History determines the amount of time that is safe for recovery. With a four hour journal history, you will be able to recover to a point four hours prior. This can be set to a higher amount, but keep in mind that a larger journal history consumes more storage as it saves more restore points.
- Target RPO Alert: This is the alert threshold set when monitoring the RPO of a VPG and is set to five minutes by default. In most cases, your RPO should be around 15 or 20 seconds. However, if the bandwidth is saturated by a high change rate or network issues, the RPO may begin to grow. In this case, if the RPO reaches five minutes, meaning Zerto has not been able to create a checkpoint in five minutes, Zerto will begin alerting you of the RPO breach.
- Test Reminder: Set to none by default, this sets a reminder for Zerto to alert you when you have gone a certain period of time without conducting a failover test.
- There are advanced settings for the journaling that can be changed, but it is best to leave this to default unless instructed otherwise by 11:11 or Zerto support.
Click “Next” to continue to wizard. Under the Storage tab, you will see the disks attached to all servers in the VPG. You may notice that the thin check box is checked for some of the disks. This means that the source server disk is using Thin Provisioning. On the 11:11 side, the disks are deployed using Thick Provisioning. The source side may have a 100GB thin provisioned disk with only 50GB used. This means the amount of space used by this server is just 50GB. To prevent over-provisioning on 11:11’s side, we will convert this to Thick provisioning. So, the disk set to 100GB will actually consume 100GB of storage. You will see more accurate storage usage numbers in the Zerto console if you uncheck all of the checkboxes under the Thin Column.
The Swap column allows you to set a disk to be ignored by Zerto. Keep in mind that during the initial replication, this disk will be replicated. However, after the initial sync, the disk is no longer replicated. This can be helpful if you have swap files on servers or dedicated disks for log files or backups that are not necessary during a failover scenario. Click “Next” to continue.

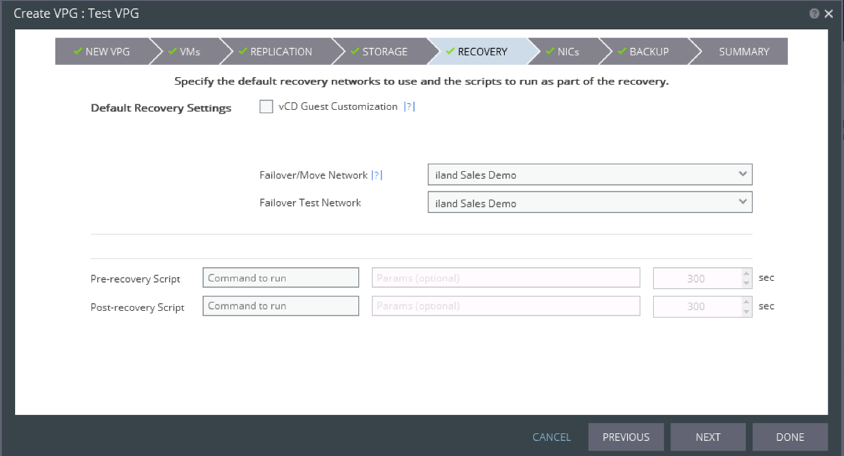
Under the Recovery tab, you can set the networks to be used by the VMs in the VPG on failover. Usually, 11:11 will create a network that mimics your production network(s). If you group VMs together that use different networks, we will be able to change the networks for individual NICs on the next page. This setting helps you to set the bulk of the VMs to use one network. You can also choose different networks for a live failover and test failover. For instance, if you want the failover environment to use the same subnet as production but a different subnet during a test, that can be configured here. Keep in mind that changing the network requires the IPs to change on the failed-over servers, which might break certain ties between servers or applications when communicating.
There is also a vCD Guest Customization checkbox on this page. vCD Guest Customization is a VMware vCloud Director feature that allows you to change guest operating systems for a server from outside the VM. This can be helpful for templates, but with servers already configured, it can be tricky. The server’s hostname, IP address, and DNS servers could be changed, and domain controllers or services may be severely affected. Therefore, this feature is not typically recommended for use. If you are changing IPs, 11:11 engineers will work with you on this feature to make sure we prevent any unwanted changes. When you have the networks selected, click “Continue.”
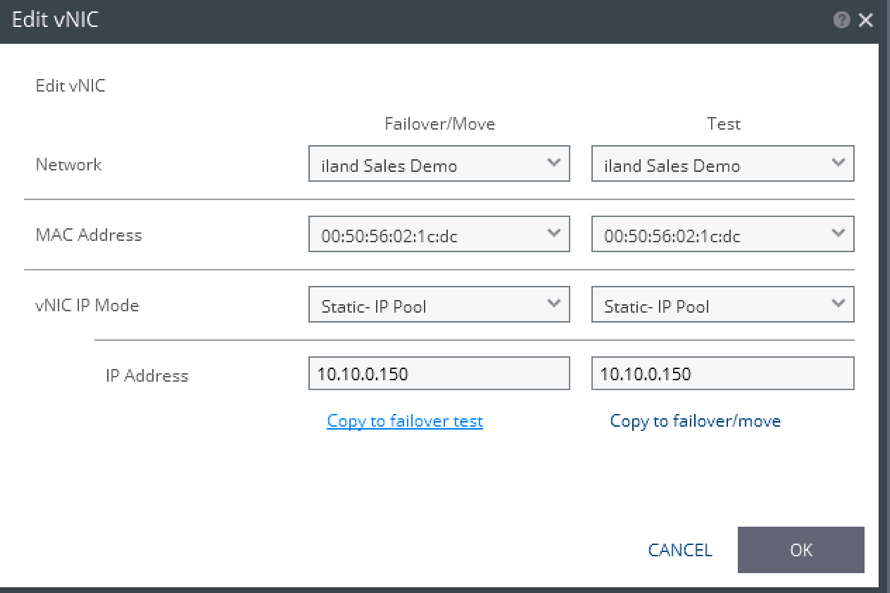
The NICs tab will show the NICs for each VM, the network they are attached to, if they will be connected on failover, and the IP/MAC address used. Here you can change the network for individual NICs and their IP assignments. For instance, if a VM has two NICs that connect to two different networks, you can match that configuration here. Or if you have all servers on a production network, you can have one of the servers on a DMZ network. You can also choose to have a NIC disconnected, in the case where it might be attached to a network not needed in a recovery situation. The IP should be pulled from the VMware tools in your environment. If the IP is not automatically added, you may need to input the IP manually or add a new IP to be used if you are switching subnets. The MAC Address should match the source server’s MAC Address and stay the same on failover. Keep in mind that there is a Live Failover/Move tab and a Test tab. So you can change the network settings for a test, but leave everything the same during a live failover.
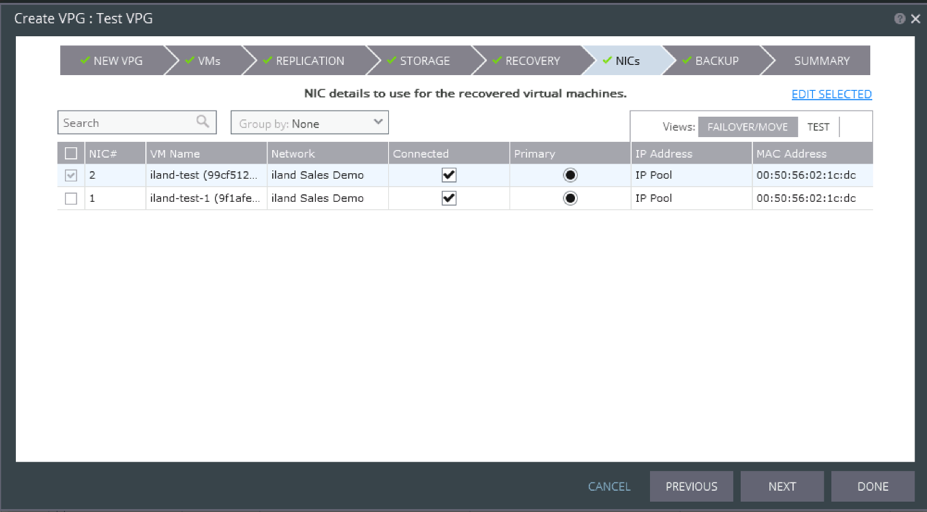
It may be easier to adjust network settings for a NIC by checking the box on the left-hand side and clicking the “EDIT SELECTED” button. This brings up the Edit vNIC window where you can change and copy over settings for live and test failover scenarios. Once you have your networks set as desired, click “OK” and “Next” to continue.
The next page will be for Zerto Backups. Right now, that is not being utilized by 11:11 and can be skipped. If you need more information about the Zerto backups, please contact your account manager. Continue on to the Summary tab.
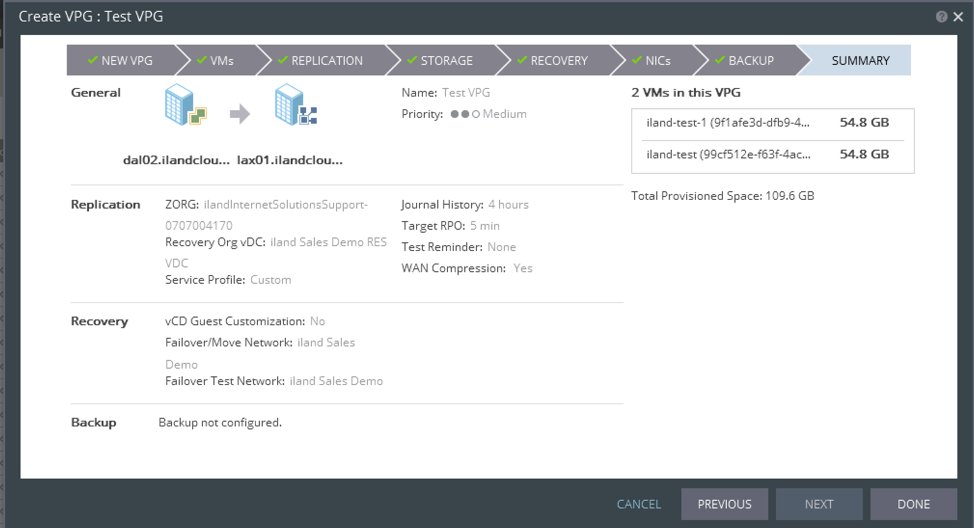
The last Summary tab will show your VPG settings. Verify these settings are correct and click “Done” to create the VPG. You should now see your VPG listed under the VPGs tab, and once created, it will begin its initial replication. You can continue to create more VPGs from here, but keep in mind that the more VPGs that are initializing, the more bandwidth that will be consumed by Zerto. You may find that it is best to allow VPGs to finish their initial sync before creating another one.
I hope you found this overview of Zerto VPG considerations and best practices useful. It is certainly worth taking the time to carefully allocate your VMs to VPGs before going live with your Zerto Cloud replication. Doing this could save you a lot of heartache during a failover situation! In my next blog, I’ll cover live and test failovers.