Skip to content
11:11 Systems
Rethink Connected
11:11 Systems11:11 Systems
  • Why 11:11
    • Submenu
      • Column 1
        • Cloud Console
          Cloud Console
          Compliance
          Compliance

      • Column 2
        • Global Regions
          Cloud Regions
          Catalyst
          Planning and Assessment

      • WHY CHOOSE 11:11
      • Overview
      • Leadership
      • News & Media
      •  
      • Careers
      • Technology Partners
      • Customer Stories
  • Products & Services
    • Products & Services
      • CLOUD
      • Cloud Overview
      • Public Cloud
      • Private Cloud
      • Object Storage
      • Cloud Labs
      • Colocation/Bare-Metal
      • BACKUP
      • Backup Overview
      • Veeam Backup
      • Microsoft 365 Backup
      • Managed Backup for Cohesity
      • DISASTER RECOVERY
      • DRaaS Overview
      • DRaaS for Veeam
      • DRaaS for Zerto
      • DRaaS for Azure
      • Autopilot
      • SECURITY
      • Security Overview
      • Continuous Risk Scanning
      • Managed SIEM
      • Managed EDR
      • Managed Firewall
      • CONNECTIVITY
      • Connectivity Overview
      • SD-WAN
      • Multi-Cloud Connect
      • Managed IP
  • Solutions
    • Solutions Submenu
      • INDUSTRY
      • Education
      • Financial
      • Government
      • Healthcare
  • Partners
    • Partners Submenu
      • Overview
      • Become a Partner
      • Partner Portals
  • Resources
    • Resources Submenu
      • Events
      • Webinars
      • News & Media
      • White Papers
      • Podcast
      • Data Sheets
      • Customer Stories
      • Innovation Blog
  • Support
    • Support Submenu
      • Contact Support
      • Product Documentation
      • API Documentation
Search:
  • Console Login
  • Contact
Header Right Menu
Free Trial
  • Why 11:11
    • Cloud Console
    • Compliance
    • Cloud Regions
    • Planning and Assessment
    • WHY CHOOSE 11:11
    • Overview
    • Leadership
    • News & Media
    • Careers
    • Technology Partners
    • Customer Stories
    • Blog
  • Products & Services
    • CLOUD
    • Cloud Overview
    • Public Cloud
    • Private Cloud
    • Object Storage
    • Cloud Labs
    • Colocation/Bare-Metal
    • BACKUP
    • Backup Overview
    • Veeam Backup
    • Microsoft 365 Backup
    • Managed Backup for Cohesity
    • DISASTER RECOVERY
    • DRaaS Overview
    • DRaaS for Veeam
    • DRaaS for Zerto
    • DRaaS for Azure
    • Autopilot
    • SECURITY
    • Security Overview
    • Continuous Risk Scanning
    • Managed SIEM
    • Managed EDR
    • Managed Firewall
    • CLOUD CONNECTIVITY
    • Connectivity Overview
    • SD-WAN
    • Multi Cloud Connect
    • Managed IP
  • Solutions
    • INDUSTRY
    • Education
    • Financial
    • Government
    • Healthcare
    • Column 2
  • Partners
    • Overview
    • Become a Partner
    • Partner Portals
  • Resources
    • Events
    • Webinars
    • News & Media
    • Whitepapers
    • Podcast
    • Datasheets
    • Customer Stories
    • Innovation Blog
  • Support
    • Contact Support
    • Success Center
    • API Documentation
  • Contact
  • Console Login
  • Free Trial
Tags: Disaster Recovery
Author: Mike Mosley
Date: January 23, 2017

Zerto Cloud Disaster Recovery – Installation and Configuration Best Practices

zertoEditor’s Note: As of January 2022, iland is now 11:11 Systems, a managed infrastructure solutions provider at the forefront of cloud, connectivity, and security. As a legacy iland.com blog post, this article likely contains information that is no longer relevant. For the most up-to-date product information and resources, or if you have further questions, please refer to the 11:11 Systems Success Center or contact us directly.

Before you can start replication to the 11:11 Cloud, you will need to complete a couple of installation and configuration tasks with Zerto to prepare your environment. The installation process is typically seamless and quick, and the 11:11 Systems team is always available for any assistance needed. Please see the guide below for more information and best practices when configuring your Zerto infrastructure.

Installing Zerto on your ZVM Server

The first step for the Zerto installation is to download and extract the Zerto installer to a Windows server that will function as the Zerto Virtual Manager (ZVM). The main requirement is that the ZVM is installed on a Windows 2008 R2 server or higher. However, it is recommended that this server is not the vCenter server. Ideally, this server should be dedicated to just running the Zerto services if possible. The goal is to make sure there are no extra loads or services on this server that may impact the performance of any Zerto processes. You should also make sure that this server is able to log in to your vCenter infrastructure.

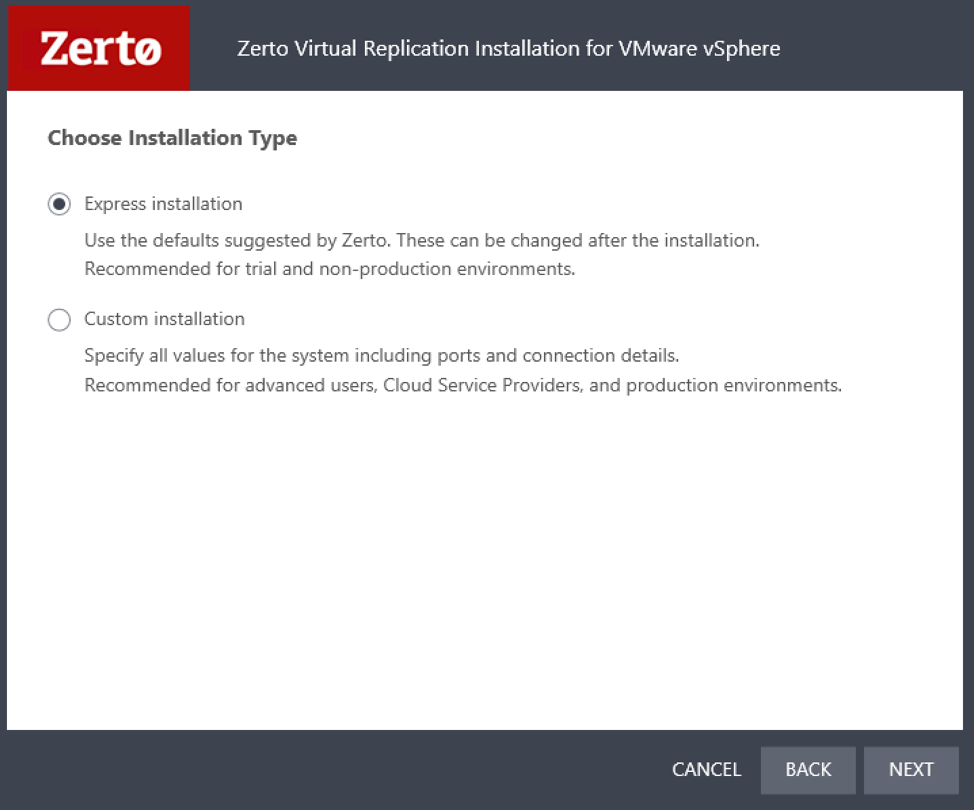
Once you have the Zerto installer downloaded and extracted, go ahead and start the installation. The first window will be an intro to the Zerto installation wizard. Click “next” to continue the installation. Accept the license agreement and click “next.” Then, you will select the install folder for Zerto. Typically, you can just leave this to default. Click “next” to continue. Use the Express Installation method, as we will not need to make any changes to the default ports or configuration.
zerto_installation

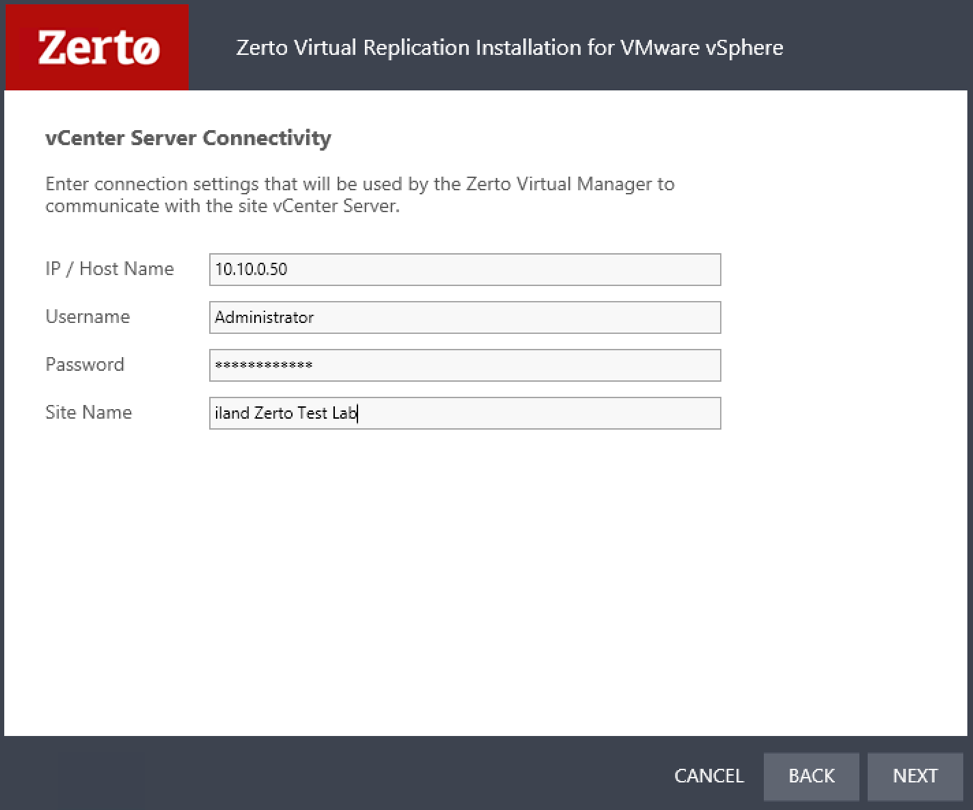
Click “next” to open the vCenter connectivity page. On the vCenter Server Connectivity window, you will need to input the vCenter IP or hostname, username, password and site name.

  • The vCenter IP or hostname will be the same one you use when logging into the vSphere client.
  • The username and password can be any user that has authoritative access. Once installed, you will have the ability to add users and permissions through the vCenter user settings.
  • The site name is the name given to your site. You can set this to something like “[Company Name] ZVM.” This will only act as a label for your site in the Zerto GUI.
zerto_installation_connectivity

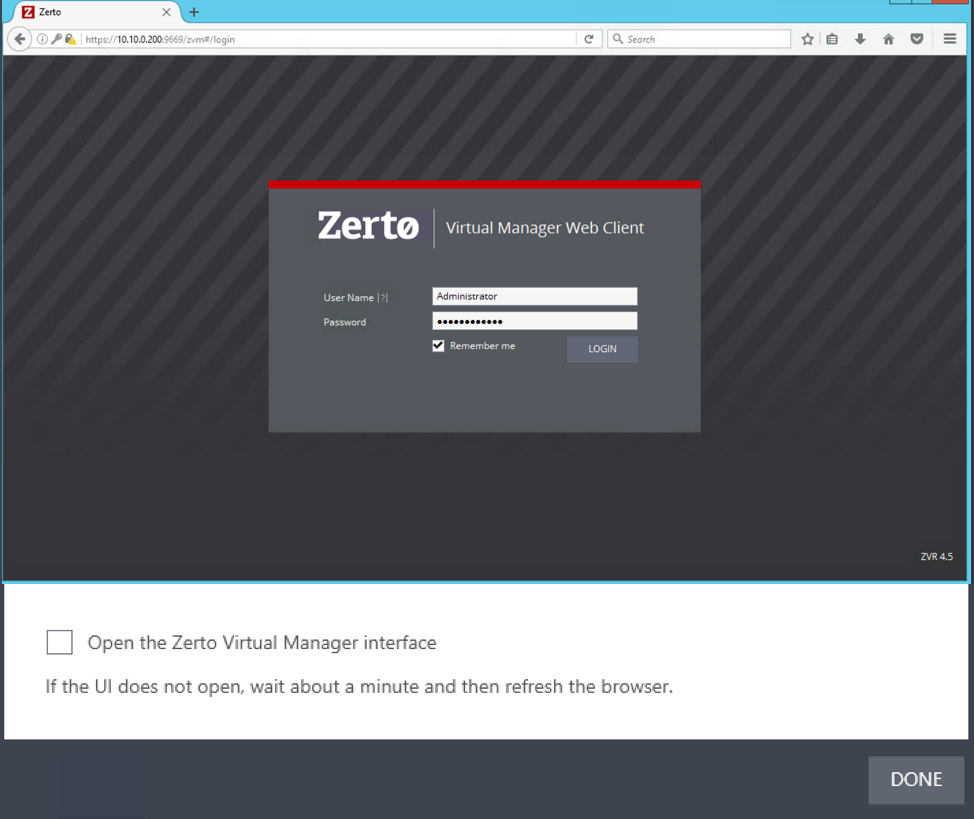
Once you have this filled out, click “next,” and Zerto will run a few checks to verify vCenter access and that the required ports are open. When that completes and all checks succeed, click next to begin the actual installation. Once the install completes, you will see the summary screen. You can click the checkbox to open the Zerto Management Interface.
zerto_virtual_manager

You are also able to access this interface by going to https://[zvm.internal.ip.address]:9669. For instance, if your ZVM is on IP 10.10.0.200, you can access https://10.10.0.200:9669 from any server on the same network to access the Zerto GUI.

After logging into Zerto for the first time, you will need to pair to the 11:11 infrastructure. Click the Radio Button that says “pair to a site with a license.” This will connect your ZVM to 11:11 and the IP to use (usually 172.16.12.2) will be confirmed and given to you by 11:11 during the deployment phase.
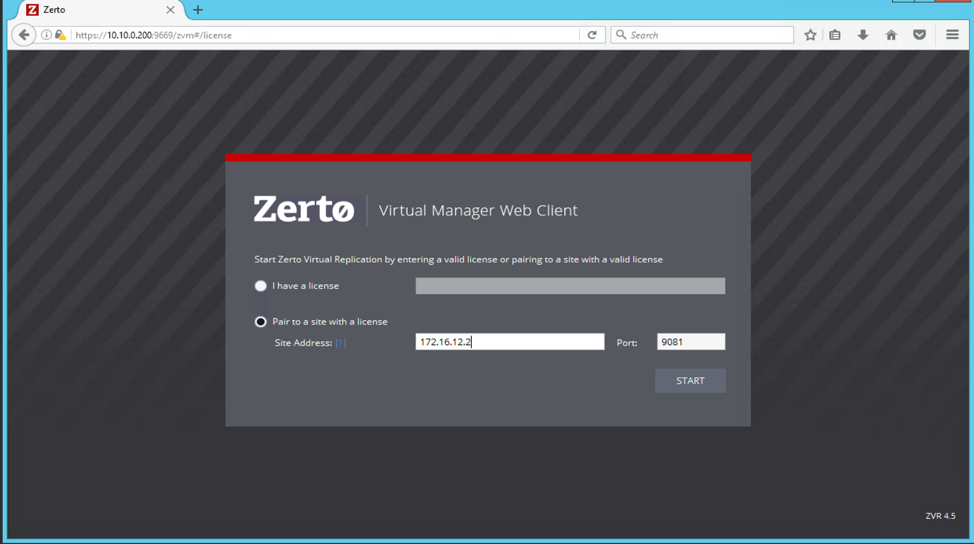
zerto_virtual_manager_web_client

VRA Installation

After pairing to 11:11, you will need to deploy the Virtual Replication Appliances (VRAs). You will need to install a VRA on each host that has VMs you wish to replicate to 11:11. In order to install the VRAs, you will need to ensure SSH is enabled on the host and have the host’s root password available as well as an available IP address. You may have a host or cluster of hosts that only hold development or testing servers. If you do not wish to replicate these servers, you do not need to install a VRA on those hosts.

In Zerto, click on the setup tab, which should show a list of hosts in your vCenter environment.
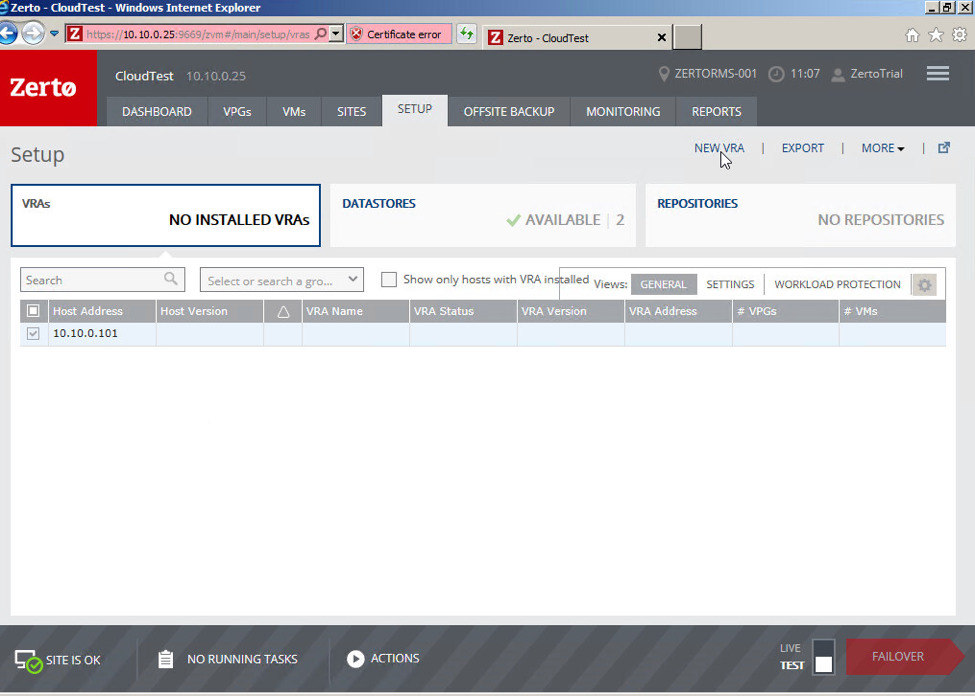
Check one of your hosts that you wish to install a VRA on. You will only be able to install one VRA at a time, so you will only check one of the hosts. Click the “New VRA” button in the upper right-hand portion of the screen. This will open the VRA installation window, where you will need to configure the settings for the VRA server.

  • Check the box to “Use credentials to connect to host”
  • Host Root Password: root password of the host
  • Datastore: You can select any datastore that is available and has enough free space, including local storage. **Each VRA will use about 12GB**
  • Network: the network to assign the VRA on. This will likely be the same network that the hosts are on and will need to have access across the replication VPN to 11:11
  • Amount of VRA RAM: This is the amount of RAM to be reserved for the VRA from the host. Best practice is to use 3GB to start.
    • This amount will be reserved from the host. If you have a larger environment, this may need to be increased.
  • VRA Group: Do not change anything here.
  • Configuration: Allows you to configure a Static IP or use DHCP
  • Address: Static IP to be assigned to VRA
  • Subnet Mask: Subnet mask of the network the VRA is on
  • Default Gateway: The default gateway of the network the VRA is connected to
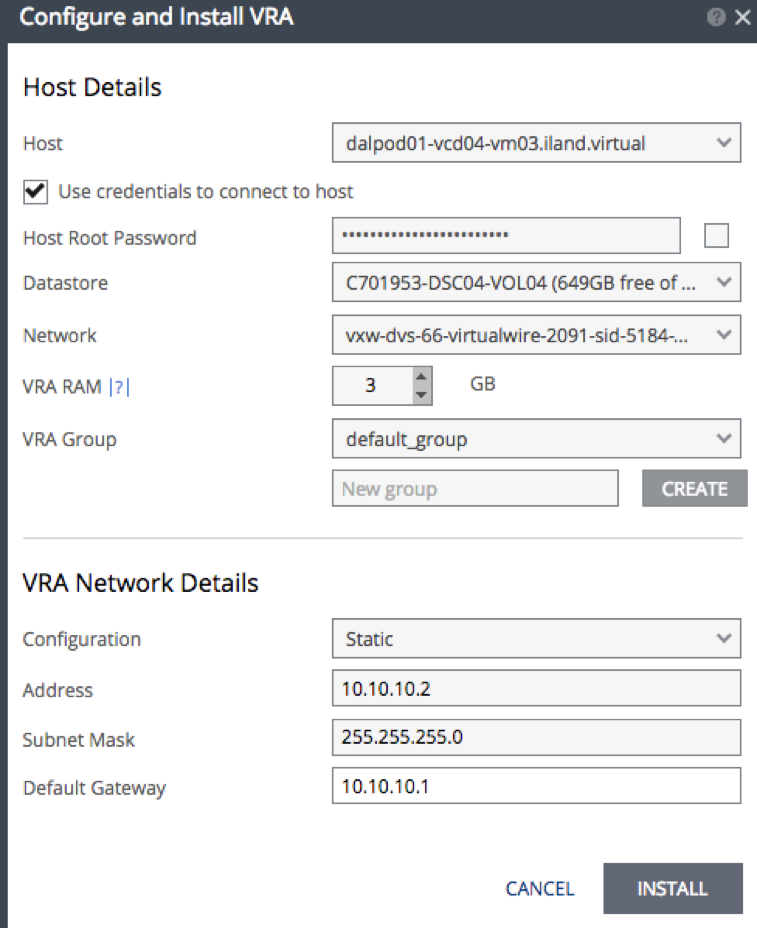
Ensure that the VRA installs successfully. In your vSphere client, you should see the new VRA deployed on the host. Zerto uses VMware affinity rules to ensure this VRA always stays on this host. When all VRAs have been installed, you will be ready to start creating VPGs. In my next blog, I’ll be focusing on best practices for creating VPGs.

Categories: DRaaS, ZertoBy Mike MosleyJanuary 23, 2017
Tags: Disaster Recovery

Author: Mike Mosley

Mike Mosely is a cloud engineer at 11:11 and has worked at the company for over 3 years. He holds a number of VMware certifications including VCP5 as well as the Veeam VMCE certification. Mike works closely with customers to build cloud solutions that fit their requirements.

Post navigation

PreviousPrevious post:Zerto Replication to the Cloud – VPG Considerations and Best PracticesNextNext post:Snopes for IT: The Myth of Hybrid Cloud

Related Posts

Preparing for 2023 with 11:11 Systems: IT Trends in Security, Cloud, and More
February 1, 2023
11:11 Systems Wins 2022 Backup and Disaster Recovery Award from Cloud Computing Magazine
January 25, 2023
How businesses can respond to IT disruptions during the holiday season
January 4, 2023
The CloudBytes Podcast: Season 3 is Here!
December 2, 2022
Celebrating Get To Know Your Customers Day
October 20, 2022
Experts: Prepare for Busy 2022 Hurricane Season
July 1, 2022
PRODUCTS & SERVICES
  • Cloud
  • Backup
  • Disaster Recovery
  • Managed Security
  • Connectivity Solutions
  • Compliance
COMPANY
  • Why 11:11
  • Customer Stories
  • Careers
  • Leadership
  • Technology Partners
  • News & Media
  • Contact Support
CLOUD REGIONS
  • North America
  • EMEA
  • APAC
CONNECT
  • LinkedIn
  • Twitter
  • Facebook
  • Youtube

© 2023 11:11 Systems Inc., All Rights Reserved | Privacy Notice

Go to Top
PRIVACY POLICY AND COOKIE CONSENT
To provide the best experiences, we use technologies like cookies to store and/or access device information. Consenting to these technologies will allow us to process data such as browsing behavior or unique IDs on this site. Not consenting or withdrawing consent, may adversely affect certain features and functions.
Functional Always active
The technical storage or access is strictly necessary for the legitimate purpose of enabling the use of a specific service explicitly requested by the subscriber or user, or for the sole purpose of carrying out the transmission of a communication over an electronic communications network.
Preferences
The technical storage or access is necessary for the legitimate purpose of storing preferences that are not requested by the subscriber or user.
Statistics
The technical storage or access that is used exclusively for statistical purposes. The technical storage or access that is used exclusively for anonymous statistical purposes. Without a subpoena, voluntary compliance on the part of your Internet Service Provider, or additional records from a third party, information stored or retrieved for this purpose alone cannot usually be used to identify you.
Marketing
The technical storage or access is required to create user profiles to send advertising, or to track the user on a website or across several websites for similar marketing purposes.
Manage options Manage services Manage vendors Read more about these purposes
View preferences
{title} {title} {title}
PRIVACY POLICY AND COOKIE CONSENT
To provide the best experiences, we use technologies like cookies to store and/or access device information that allows us to process data such as browsing behavior. Not consenting or withdrawing consent, may adversely affect certain features and functions. By clicking Accept, closing this message, or continuing to browse, you consent to these technologies and accept our Privacy Notice.
Functional Always active
The technical storage or access is strictly necessary for the legitimate purpose of enabling the use of a specific service explicitly requested by the subscriber or user, or for the sole purpose of carrying out the transmission of a communication over an electronic communications network.
Preferences
The technical storage or access is necessary for the legitimate purpose of storing preferences that are not requested by the subscriber or user.
Statistics
The technical storage or access that is used exclusively for statistical purposes. The technical storage or access that is used exclusively for anonymous statistical purposes. Without a subpoena, voluntary compliance on the part of your Internet Service Provider, or additional records from a third party, information stored or retrieved for this purpose alone cannot usually be used to identify you.
Marketing
The technical storage or access is required to create user profiles to send advertising, or to track the user on a website or across several websites for similar marketing purposes.
Manage options Manage services Manage vendors Read more about these purposes
View preferences
{title} {title} {title}