 Editor’s Note: As of January 2022, iland is now 11:11 Systems, a managed infrastructure solutions provider at the forefront of cloud, connectivity, and security. As a legacy iland.com blog post, this article likely contains information that is no longer relevant. For the most up-to-date product information and resources, or if you have further questions, please refer to the 11:11 Systems Success Center or contact us directly.
The flexibility and scalability of Zerto replication technology mean that not only is it used for business continuity purposes in a cloud-based DR scenario, but also increasingly for migrating workloads to the cloud. In this blog, we will provide an overview of the important considerations that need to be made when using Zerto with a VMware based cloud provider. The following recommendations apply to scenarios where you are migrating VMs to a vCloud Director environment as well as protecting VMs using Zerto replication. In the event of a failover, you will find that adhering to the following recommendations in your on-premises environment will ensure a smooth transition for the duration of your disaster scenario.
we recently wrote a
blog exploring issues to consider when migrating VMware virtual machines to the cloud. In this blog, we will go through the pre-migration steps necessary to move your VMs to the cloud and we’ll follow that up with a blog on post-migration steps.
Cautions for VM Cloud Migration
One of the popular cases for using Zerto Virtual Replication is migrating workloads to the cloud with minimal downtime. This is possible due to two major advantages of using Zerto technology: continuous replication, which means the latest copy of the data is already in the cloud, and the efficiency of the live failover function, which means even a large group of VMs can be created and powered on in the recovery site within minutes.
The fast pace at which production VMs can be moved from your on-premises environment into a vCloud Director-based cloud should not dissuade anybody from taking the necessary precautions to ensure the transition will be as smooth as possible. While the back-end infrastructure of a cloud provider utilizing VMware’s technology would be similar to your own vSphere environment, any differences in software versions or utilized hardware would need to be accounted for. This will ensure that not only will your VMs come up, the OS boots, and the applications you are running perform at a level your users or customers are expecting.
Updating the virtual hardware version
Most virtualized environments will have VMs with various virtual hardware compatibility versions. This setting is often overlooked due to the seemingly limited benefits it offers. This is becoming more and more of a misconception as the performance of the underlying hardware becomes greater. A low virtual hardware compatibility version might limit the virtual hardware that can be attached to a VM. A great example, that can significantly increase performance would be using VMXNet3 10Gb network adapters or paravirtual storage controllers and limiting the vCPUs that can be allocated to a VM. The full list can be found in
this article.
As the virtual hardware version upgrade requires downtime and can only be performed on a powered-off VM, it’s best to proceed with the upgrade after the migration to avoid unnecessary downtime in the future. You don’t want to be in a position where you would like to hot-add hardware to your VM only to find out that the specific hardware in question is not available without moving to a higher version of the virtual hardware.
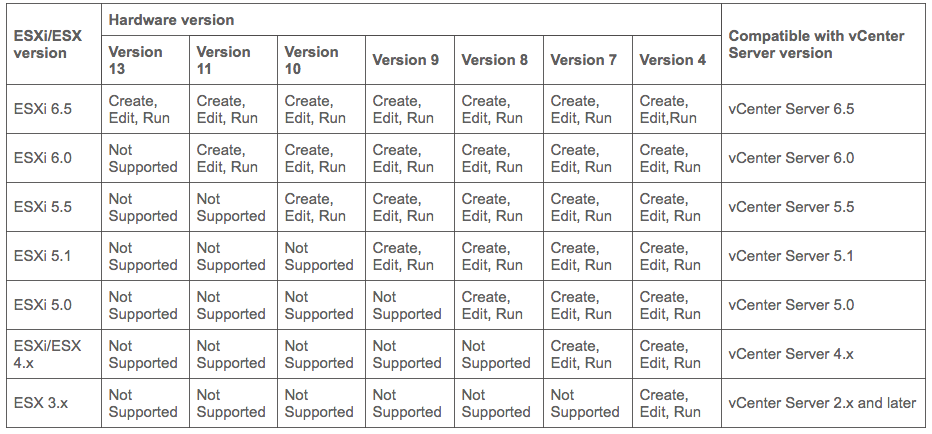
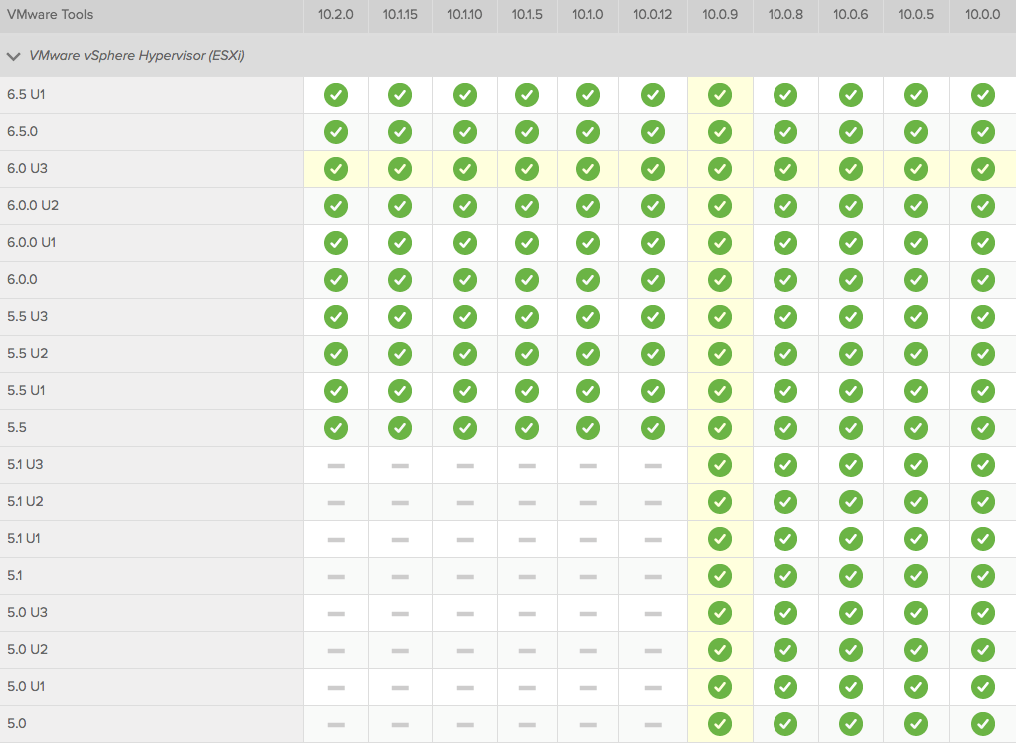
ESXi/ESX hosts and compatible virtual machine hardware versions list – source: https://kb.vmware.com/s/article/2007240
It’s very important to remember that the virtual hardware version supported by a VMware platform is limited by the version of vSphere running on that platform. As such, when moving workloads to the 11:11 Cloud, please make sure that your VMs do not exceed the maximum version we support in our data centers. You can check the current versions being utilized by 11:11 Systems on the
11:11 Product Compatibility Matrix page.
The process for updating the virtual hardware version is very simple and very similar across vSphere and vCloud interfaces, as well as the 11:11 Cloud Console. It’s just a case of powering off the VM in question, right-clicking it, and selecting Upgrade Virtual Hardware/Manage Virtual Hardware. Precautions should be taken, however, as there’s no easy way to rollback this change – VMware does not offer an interface to do so. The safest way to proceed would be to take a snapshot of the VM beforehand. If you encounter any problems, you can revert to the snapshot, which will roll back the virtual hardware version change. In case of any problems, VMware recommends two other ways to revert back to an older version of virtual hardware, both of which are easy to execute in a vSphere environment. As per the following
knowledge base article, you can either attach the existing drives to a new VM or edit the VMX file of a virtual machine.
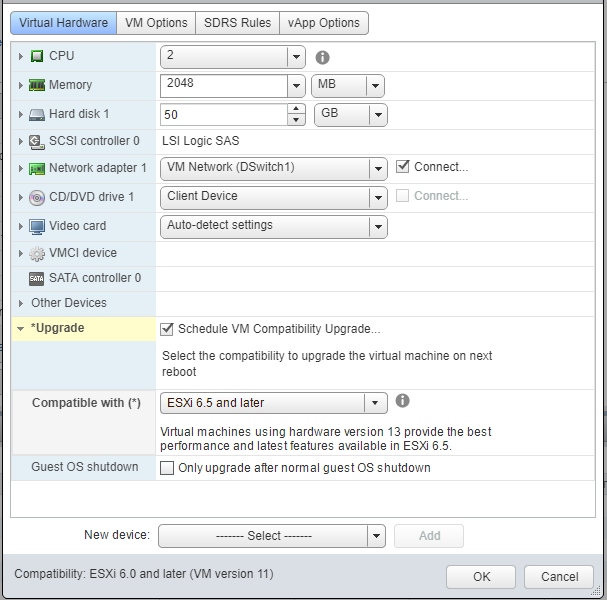
The virtual hardware update can be scheduled to occur automatically on VM reboot or shutdown. As this method does not offer any rollback caution is advised.
As a best practice, make sure that the VM is running the latest version of VMware tools before proceeding with the virtual hardware upgrade. Update VMware tools if necessary to avoid any problems with the new hardware.
Updating VMware tools
Before we discuss the update process itself, let’s outline the role of VMware tools in our VMs. The importance of VMware tools cannot be overlooked as they are effectively the drivers for your operating system running in a virtual machine. It’s not just about the graphics driver and the mouse/keyboard performance in the console. While that is also the case, the biggest benefits are much more important and relevant even to operating systems that don’t care for a GUI, i.e. *nix systems. The drivers included in VMware tools are, among others, the VMXNet network adapter drivers, which will provide your VM with 10Gb connectivity, and the Paravirtual SCSI driver, which will allow you to utilize the performance benefits of all-flash storage arrays while keeping CPU utilization low.
Let us not forget about the memory balloon driver, which will help with memory management in our environment, or the VSS component, which gives us the ability to take quiesced snapshots of the guest OS, enabling backup solutions, like Veeam, to take application-consistent backups.
You might think that some of the benefits are not going to be useful to you, but the rest will help you keep your VMs running smoothly and efficiently. You should therefore consider keeping them up to date and assigning that task the same priority as keeping your operating systems patched and updating the firmware on your physical hardware devices.
The traditional way of updating VMware tools would be by mounting the ISO using the vSphere or vCloud Director interface. This is a simple method that has been used for years. The benefit of this method is that you only need a CD-ROM drive in your VM in order to mount the ISO with the tools.
With the release of version 10 of VMware tools, we now have an option to download them from the My VMware website. The advantage of using the downloadable packages is that we can install a higher version than we would be able to install from the ISO. The reason for this is that the version available to mount is delivered with the version of ESXi you are using.
This means that when using downloadable packages of VMware Tools, we can prepare our VMs for migration to a higher version of ESXi. As 11:11 is in the process of updating our backend to the latest release of vSphere, this would often be the case for anybody thinking of using Zerto Virtual Replication to migrate workloads into our cloud.
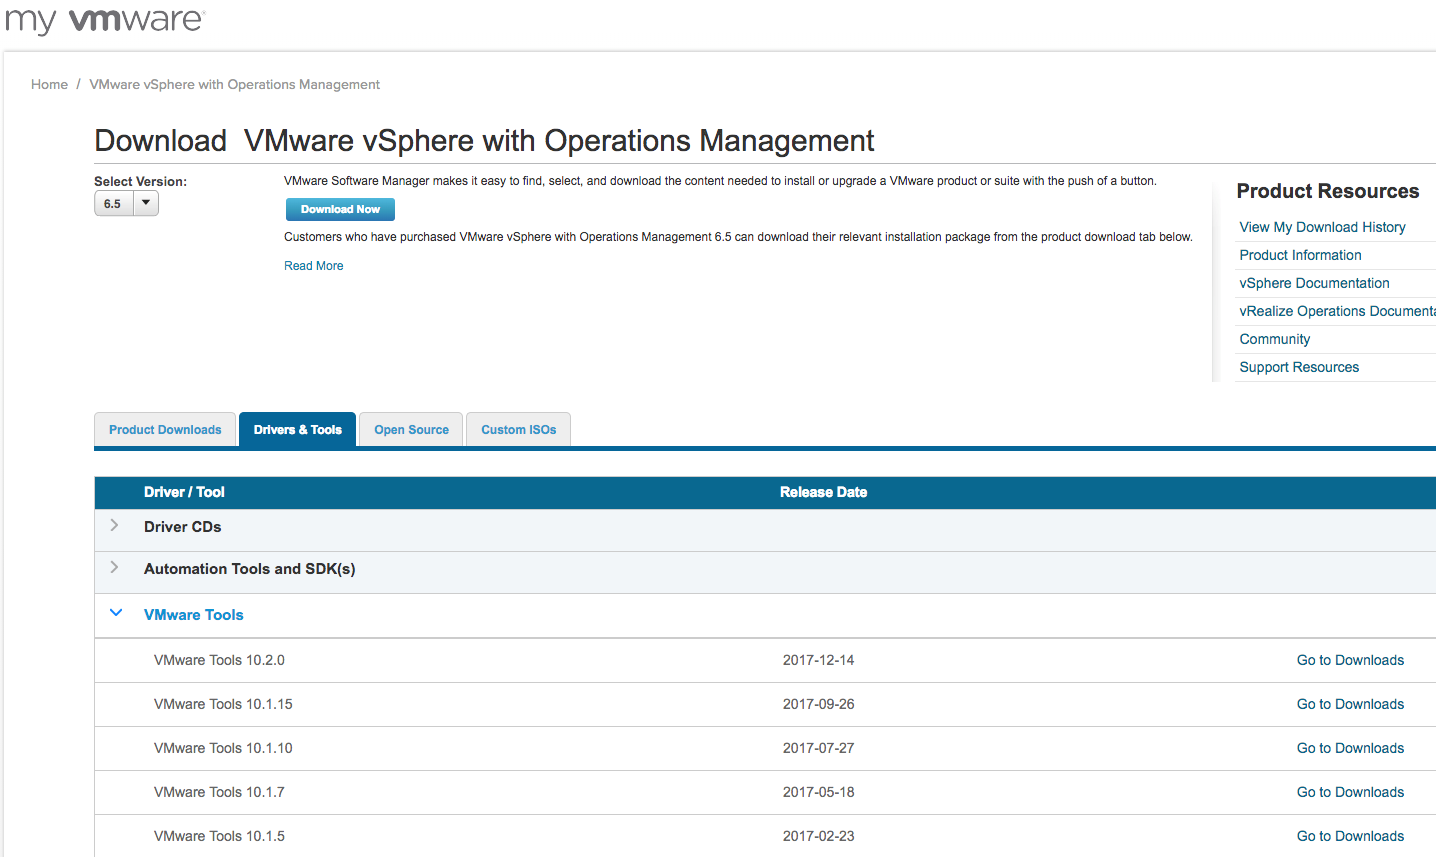
With version 10 of VMware tools they are now available for download directly from VMware’s website
We will cover the alternative methods in the second post of this series. Be sure to check them out as they can be quite time-saving.
Disabling time synchronization with the host
While you might be using time synchronization with ESXi host in your environment, it is advisable to consider switching to using an NTP server. Time synchronization is especially important within active directory environments. The default setting for time difference tolerance is only five minutes. This means that should any of your servers go out of sync above this threshold, the domain controllers would stop trusting them and not provide authentication services. This means that any applications relying on AD would effectively stop working. Within an AD environment, Microsoft recommends that the PDC of the root domain in the forest syncs it’s time with an external NTP server and the remaining domain controllers sync up to that PDC. More information on that can be found in this
article. For any non-AD environments please consult the documentation of the application to establish the recommended time sync setting.
Summary
For optimal results in migrating workloads to a VMware-based cloud with Zerto, it’s important to make sure the following points are addressed prior to moving your workloads to the cloud:
1. Make sure the virtual hardware version of your VMs is supported within the 11:11 environment.
2. Check if VMware tools are up to date to ensure good performance of the VM.
3. Disable time synchronization with the host and use an NTP server to ensure your VMs are always in sync.
Stay tuned for our next blog which continues the learning with a deep dive into post-migration tasks for successful migration to a VMware-based cloud.
Author: 11:11 Systems
11:11 Systems (“11:11”) is a managed infrastructure solutions provider that holistically addresses the challenges of next-generation managed cloud, connectivity and security requirements. 11:11 combines the teams and technology behind market leading, analyst vetted companies like Green Cloud Defense and iland to deliver increased performance, optimization and savings.