

Date: July 20, 2017
Author: Mike Mosley
Editor’s Note: As of January 2022, iland is now 11:11 Systems, a managed infrastructure solutions provider at the forefront of cloud, connectivity, and security. As a legacy iland.com blog post, this article likely contains information that is no longer relevant. For the most up-to-date product information and resources, or if you have further questions, please refer to the 11:11 Systems Success Center or contact us directly.
The Veeam Network Extension Appliance (NEA) is the default template deployed by Veeam on both source and target data centers. When used with a failover plan, this appliance will handle the outbound and inbound communication for the servers you failed over. During a partial failover, the source and target NEAs create a peer-to-peer connection. This allows your remaining production servers to communicate with, and access the failed-over server with no additional routing configuration. In this article, we will go into more detail regarding the Veeam NEA and how it works during failover procedures.
Veeam NEA Deployment
When your Veeam environment is built, 11:11 Systems will typically deploy the NEA on the target side. This NEA will handle the failover networking, allowing outbound access to the public network, as well as NAT traffic coming inbound to the servers that were failed over. When creating a failover plan, you will have the option to configure NAT rules for your servers, such as HTTP, HTTPS and RDP. This Veeam NEA will remain powered off at the target (11:11) site until a failover is initiated. After you added the service provider in your Veeam console, you should have also set the IP of the NEA with the Manage Default Gateways button. This process sets the NEA’s internal IP, which should be the default gateway of your production network, i.e. 192.168.10.1. The Manage Default Gateways button in your Veeam console sets the IP of the NEA so that on failover, your servers should route to the public as they do while in production.
While adding your service provider in your Veeam Backup Infrastructure tab, you will need to configure the NEA for the source side. While the provider is added, you will see a Veeam NEA template deployed in your source VMware environment. You will want to make sure this NEA is not set to an unused IP address, as that will cause a conflict. This source NEA will remain powered off in your environment until a partial failover is initiated. Once that happens, a bridge to the failover site is created.
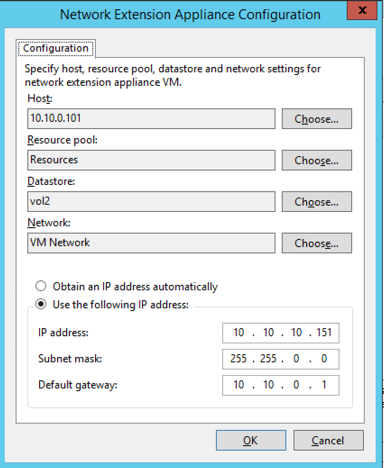
The NEA Configuration window when adding a service provider
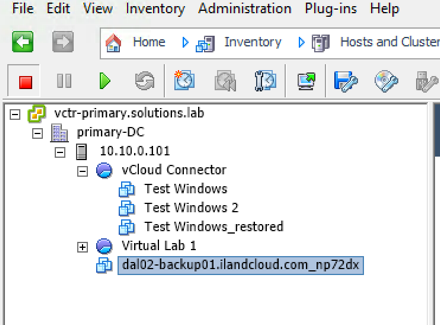
The Veeam NEA at the source data center
Some customers may choose to use their own virtual firewall in their environment, and in those cases, an NEA may not be deployed. However, it is possible to use the NEA in conjunction with a third-party firewall to allow the partial failover capabilities built-in by Veeam. This can be done by configuring the source NEA when adding the service provider as normal using an IP that is not used by any production servers. When you choose “Manage Default Gateways” in your Veeam console, you will choose another unused IP that is not the default gateway. If you are using 192.168.10.1 as the default gateway in production, you may want to set the target NEA as 192.168.10.254. With this set up, the source and target NEAs are still able to communicate with each other. You’ve created that Layer-2 bridge that allows communication internally between servers still running on the production side, and servers that have failed over. However, the servers that failed over will use your third-party virtual firewall for public network access. This set up is a bit advanced, but 11:11 engineers will be able to assist you in ensuring your partial failovers work as expected.
Creating a Failover Plan
Once you have replicated servers in Veeam, they will become visible in your Veeam console. You can view the replica servers under the Backup and Replication tab and then click the “Replicas” button. At the top of this page, you will see a Failover Plan button. You can create a Veaam Cloud Failover Plan by clicking this button and then selecting the “Cloud VMware” option. The Veeam Failover Plan allows you to group your replicas into a single failover process as well as configure NAT rules for accessing your replica servers publicly. Below, we will walk through the steps and options for creating a failover plan for your environment.

The Replica screen in Veeam under the Backup and Replication tab
-
- You first will need to give your failover plan a name and description. Click “Next” to continue.
- On the Virtual Machines page, you will be able to add VMs to the plan. 11:11 recommends having at least one plan that includes all protected servers in the case of a full data center disaster.
a. By clicking the “Add VM” button, you can select particular servers to add to the plan. The servers are grouped by their job, and you can select all servers in a job by selecting the job name. Once you have the VM(s) / job(s) selected, click the “Add” button.
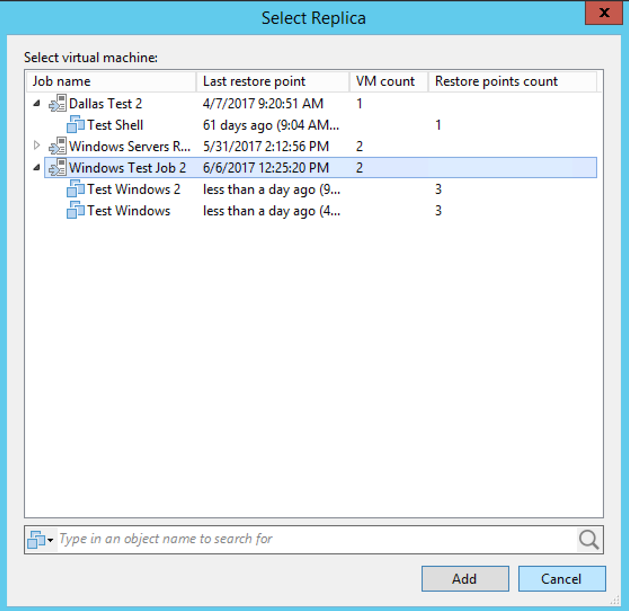
Adding replicas to a Veeam Failover Plan
b. Once the VMs have been added, you can change the order and set a boot delay for the replicas during a failover. The processing will happen from top to bottom, so if you need a server to boot first, such as a domain controller, you will want to make sure that is the first VM in the list. You can also click the “Set Delay” button to create a boot delay for the next server in the list. In my screenshot, I have set Test Windows to boot first with a two-minute boot delay for Test Windows 2.
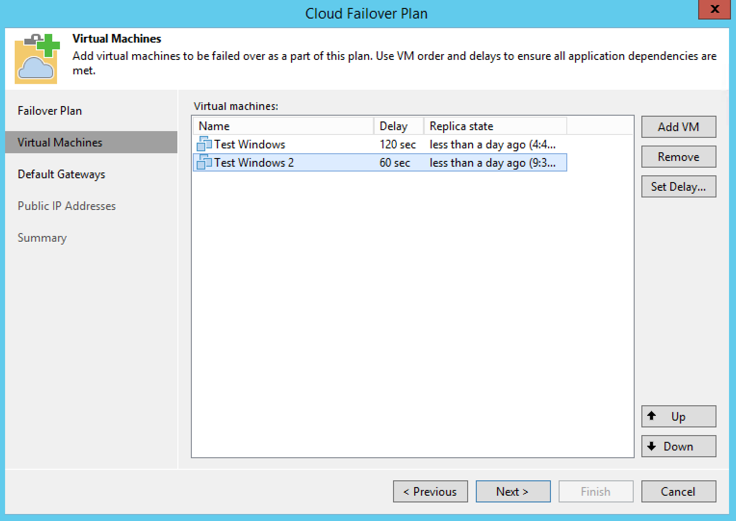
The Virtual Machines page. A boot delay of two minutes has been set for after Test Windows has been powered on
- Click “Next” to continue to the Default Gateways page. You should have already set the default gateways after adding the service provider. If not, you are able to set the default gateway here by clicking the Manage Default Gateways link. Confirm the subnet and default gateway settings are correct and click “Next.”
- On the Public IP Address page, you can configure public access with NAT to your replica servers. If you are using your own virtual firewall, you can skip this page. Check the “Assign Public IP” box and then click the “Add” button to create a rule:
-
- a.
Replica VM:
-
- Click the “Add VM” button. You can choose the VM in the failover plan you wish to create a rule for. In my example, I have chosen Test Windows.
-
- b.
Public IP address:
-
- You will have been allocated Public IPs to use in a failover by 11:11 Systems You can click the drop down to select one of these IPs. Once you have selected an IP, enter the port number for translation. In my example, I chose 3389 for RDP access.
-
- c.
Internal IP Address of Replica VM:
-
- You can use the dropdown to select the internal IP of the replica VM. Typically, you will just see one option here unless the server has multiple NICs or IPs. Again, after selecting the internal IP, you will also need to set the port. I have chosen 3389 again for public access.
NOTE: You can set for Port Translation in these options. For instance, I could set the external IP Port to 3391 and forward that to the internal port 3389.
Description:
-
- You can write down a description for the rule, .e.g “RDP for replica.”
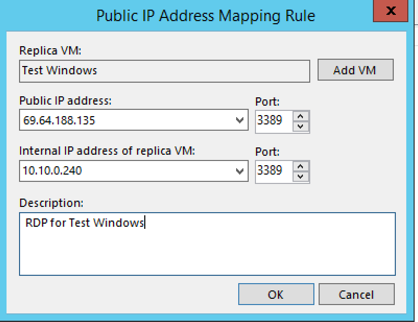
NAT Rule configuration in the failover plan
- Once you have created a rule, hit “OK” to add it to the NAT list. You can repeat this process until you have all access needed in a failover configured. Once complete, click “Next” to continue.
- On the summary page, click “Finish” to complete the Failover Plan wizard.
Once the failover plan has been created, you can view and edit it in the Veeam console. Under the Backup and Replication tab, click the “Failover Plans” button under the Replicas node.
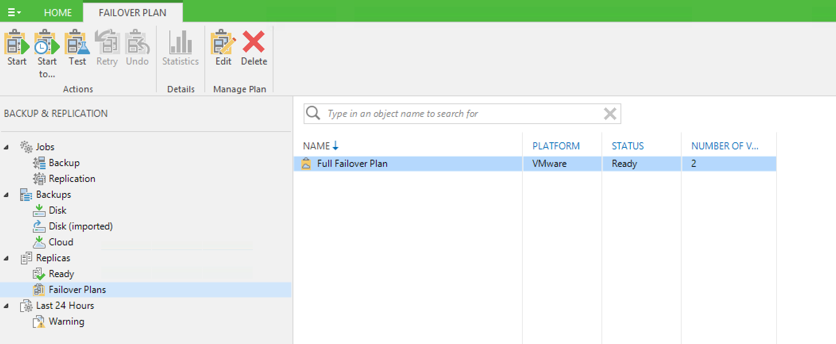
Failover Plans in the Veeam console
Failover plans are also visible to 11:11 as well as the Veeam Web Console. This is important for scenarios where your full data center, including your Veeam server, is inaccessible. In this case, you can use the Veeam Web Console to start a failover plan on your own or contact 11:11, who can also start failover plans. However, you will not be able to failover individual replicas in this situation.
At this point, we should now have working replicas and a failover plan created. The last step is to run a failover test to ensure everything is working correctly. Next, we will go over how to conduct full and partial failovers along with options to failback to production.